
If you have never used Animoto in the classroom to create online slideshows, then now is the time to start. With just a few clicks you can quickly turn your photos and videos into an animated, show-stopping, musical masterpiece for free!
Registering with Animoto
Before using Animoto in the classroom, you will have to register online. Animoto offers several pricing options for the average consumer,
but educators get an all access pass, worth $30 a year, for free. This will allow you to create an unlimited number of online slideshows that are not restricted in length. So, to get started, you need to click here to get to the Animoto for Education sign-up page.
Fill in your name, grade level, email, and school on this page. Animoto will vet your details and send you a confirmation email to activate your education class account. This may take a week or more, so bear this in mind. Share the activation link you get with your students so that they too can sign up. Please note that students under 13 have to be using teacher-created accounts. This is for the safety and security of your students. Animoto recommends you use some fake email accounts from gmail to create generic student accounts of your own for them to use.
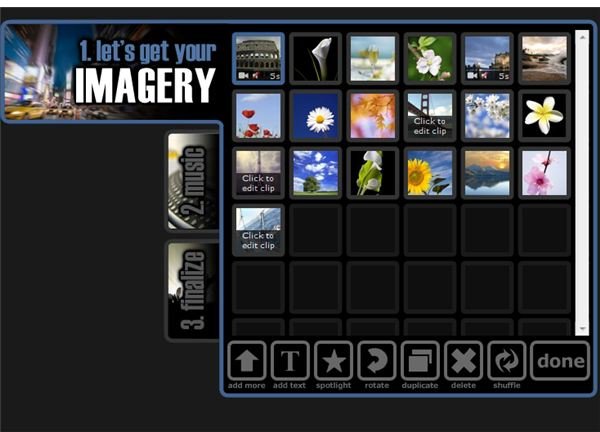
Creating Your First Video
Once logged in to the site, you are ready to create your first video slide show. This is a simple 3-step process:
Step 1: Select your pictures and/or video. You can upload images and videos of you own, select from the Animoto stock gallery, or import them from sites like Facebook, Smugmug, Flickr, Picasa, and Photobucket . Once selected, your photos and videos can be reordered simply by dragging and dropping them. Feeling more carefree? Select shuffle and have them randomly ordered by Animoto. On the same screen you can also add text to your pictures, duplicate them, rotate, delete and spotlight images. Spotlighting an image gives it more prominence in your finished slide show.
Step 2: Choose your slide show music. Think of what may be most appropriate for the online slideshows you are creating. Again, you can select music from your own collection, or choose from a variety of tunes in the Animoto library. You can browse through Animoto’s collection of music by genre. Here you will find everything from indie rock to classical melodies. A useful feature is the ability to choose where you want the start point of your soundtrack to be. If you have a short video, you may just want to begin with that catchy chorus half way through the song.
Step 3: Finalize your video. Here you can choose what speed you want the video to play at - half, normal or double speed. You can also select what thumbnail you would like to have as your video cover screen. Finally, give your video a title and write a short description of what it is about. After you do this, Animoto will process and render your video. This may take a little time, depending on how long your slide show is. Once it is ready, Animoto will email you a link to your finished slide show. On this page you will also see a blue toolbox with links to email it, embed it in your classroom website , remix or export your video.
Project Ideas for Animoto Slideshows
There are numerous ways that you can use Animoto in the classroom. It is a tool that has applications across the K-12 curriculum, and can even be a great free replacement for PowerPoint. Biographies, field trips, digital storytelling, science projects and more can all be captured with this quick and easy slideshow tool. Indeed, Animoto are showcasing many of these great uses on their own website to try and inspire creativity in their members. Click here to see examples of how teachers are using Animoto in the classroom today. Maybe we will be seeing your Animoto class project there in the near future!
This post is part of the series: Technology Tools for Teachers
The articles in this series reveal some of the best technology tools for teachers that are used in the classroom today.