
This art thematic unit plan has an introductory lesson on perspective drawing using 1 vanishing point. Students will enjoy practicing the concept in a practice lesson using their initials and when drawing a bedroom scene. Students will then design a realistic street scape using 2 vanishing points.
Perspective Drawing
Introduction
This unit plan for teaching perspective drawing includes the concept of vanishing points for middle years students. They will practice using guidelines and small examples to understand how to use sight lines in art. They will enjoy creating a drawing of a bedroom using 1 vanishing point and a streetscape using 2 vanishing points.
Introductory Lesson
Introduce the concept of vanishing point in perspective drawings by showing the vanishing point to be a point at which lines converge or disappear. Show drawings and photos from the internet of scenery with a horizon, road, tracks or sight lines that disappear off into the distance.
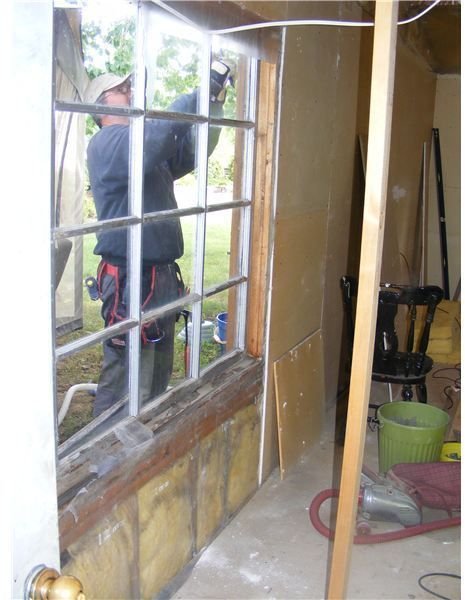
If students have use of a camera, have them take photos of scenery such as the sidewalk, a building, a hallway showing the concept of perspective with a vanishing point. Have them show where the vanishing point is in their photo.
Images

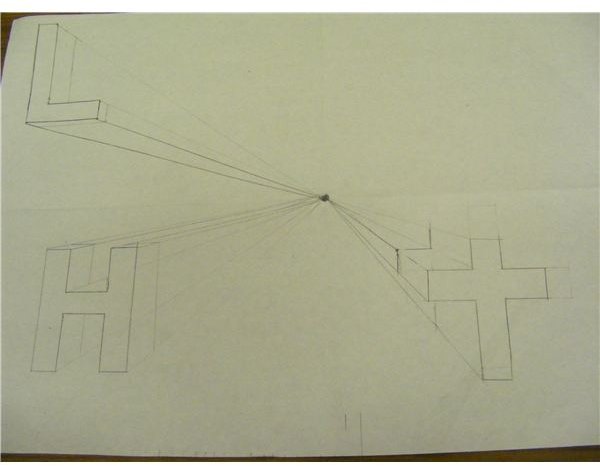
Then have students practice drawing 4 shapes above and below a horizon line to practice drawing lines to a vanishing point as a practice lesson.
Materials:
- 12 x 18 cartridge drawing paper
- 4B pencil
- ruler
Procedure:
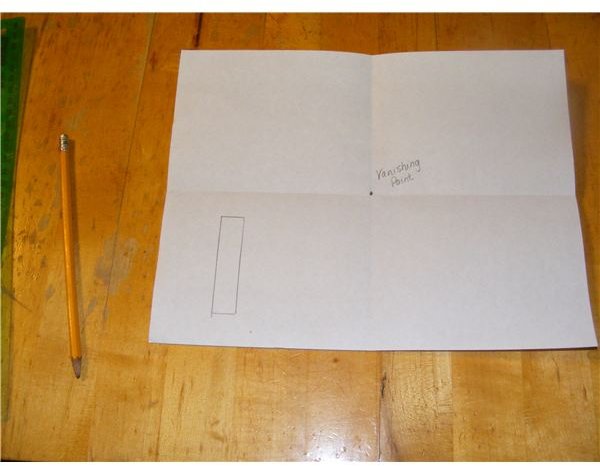
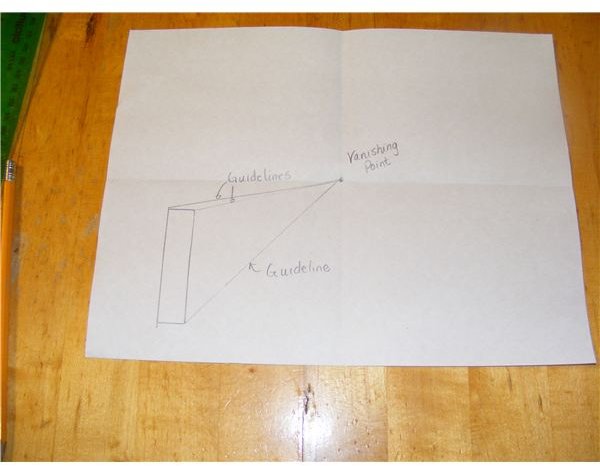
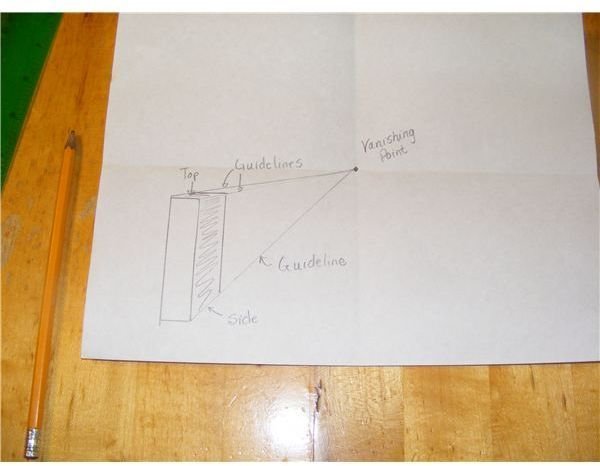
- Fold paper into quarters and open again. Put a point in the center of the paper as the vanishing point.
- Using a ruler, draw a rectangle (approximately 1 inch wide, 2 inches tall) in the lower left corner of the paper close to the corner. From 3 corners of the rectangle (top left and right corner, bottom right corner), lightly draw guidelines to the vanishing point in the paper’s center.
- Measure 2 places that are about 1 inch to the right (toward the center) of the rectangle and draw a vertical line, between the guidelines. This will become the side of the rectangular box being created.
- Draw a horizontal line above the rectangle at the point in which the vertical line touched the guideline. This will be the top of the rectangular box you are creating.
- Erase the rest of the guideline that is drawn to the vanishing point so that only the rectangular box remains.
In the upper left corner, draw a letter L and have the student make a side and a bottom to this letter using the same steps as above.
In the upper right corner, draw a cross using a ruler. Have the students create the guidelines needed and the sides and bottom of the cross using the 5 steps above.
In the bottom right corner, have them draw their own initial in block letter style. Draw the sides and top using the guidelines and 5 steps above.
A website to explain the concept is: Drawing Geometric Perspective in which simple shapes are drawn above and below the horizon line.
Practice with 1 vanishing point


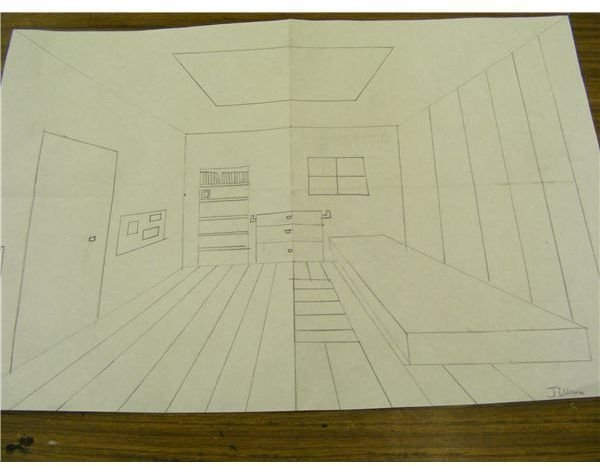
Bedroom Scene with 1 Vanishing Point
In the next lesson, remind students how to use guidelines to help draw lines with a ruler to the vanishing point. Fold paper to create 1 central vanishing point.
Creating a bedroom scene
- Fold a 12 x 18 inch paper into quarters to find central vanishing point. Mark it with a pencil.
- Measure a rectangle representing the back bedroom wall. Make it 10 cm from the top and bottom of the paper and 15 cm from the left and right side. This will create a rectangle that is 15 cm wide and 10 cm high.
- From the corners of this rectangle draw diagonal line to the corner of the paper. These lines will not be erased so can be drawn darker. They represent where the walls meet the floors and ceiling of the bedroom.
- On the bottom right corner of the picture have students draw a rectangle that is approximately 3 inches long and 1 inch high. This represents the end of a bed so should go almost half way across the paper. The corner of this rectangle should touch the diagonal line where the wall meets the floor. It should also be close to the bottom of the paper.
- Draw the guidelines from the 3 corners of this rectangle to the vanishing point. Draw the vertical line for the side of the rectangular box 2 or more inches to the left of the rectangle which represents the side of the bed. Draw the horizontal line above the rectangle 2 or more inches toward the center of the paper. Use the guidelines to know where to draw in these vertical and horizontal lines. This is creating a rectangular bed in the bedroom.
- Draw a door on the left side of room using 2 vertical lines and a line above the horizon that leads the eye down to the vanishing point. Draw a window or poster on the right side of room above the horizon using 2 vertical lines and a top and bottom lines which go toward the vanishing point. You can simply draw vertical lines on the left and right sides of the room as striped wallpaper.
- To draw a hardwood floor, measure marks on the central back wall rectangle every .5 cm. From these marks draw lines to the bottom of the paper using the vanishing point. They will not be parallel, but will fan out across the bottom of the page since they converge at the vanishing point.
- Draw a light on the top of the paper (the ceiling) by drawing 2 horizontal lines and 2 sides that go toward the vanishing point.
Perspective Using 1 Vanishing Point in a Bedroom Scene

Hints and Tips For One Vanishing Point Bedroom Scene Lesson
- Draw a sample bedroom for students to follow.
- Begin with the bed, going step by step, then add other objects to the 4 sides of the room.
- Always use a ruler to draw. Do not make curved pillows or curtains or patterns on this drawing. Remind students it is about the concept of lines and vanishing points, rather than trying to draw an ideal bedroom.
- Draw doors and windows at appropriate heights for a bedroom. Vertical lines on a wall should be measured equally distant apart to be sure they are parallel.
- Use erasers to correct mistakes rather than permanent dark lines as students are learning a new concept and applying it to many shapes in the room.
- Do not color the drawing. Use shading techniques to enhance lighting concepts if possible.
- Display the bedrooms in a row to show how each drawing leads the eye towards the center of the paper. Line them up using the horizon line half way down the page.
Single Vanishing Point Drawings - Towers and Holes
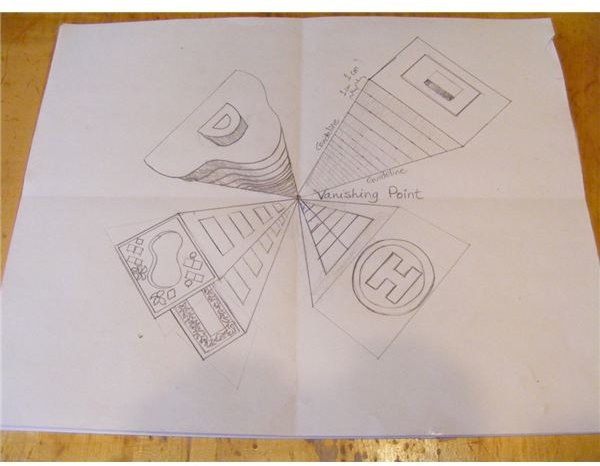
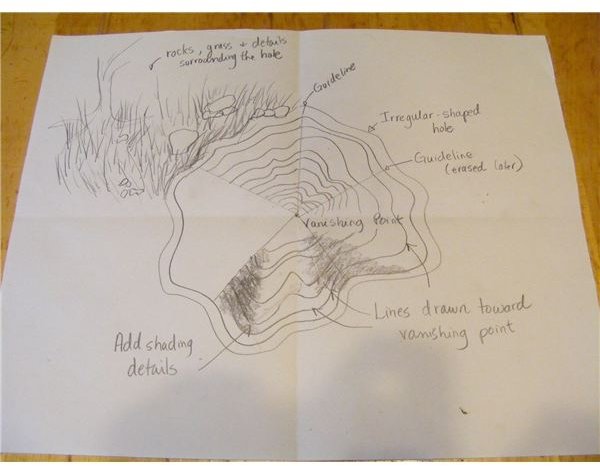
Lesson on Perspective Drawing with One Vanishing Point - Towers & Holes
Students can be shown next how to draw an aerial view of a scene using 1 vanishing point. They can simply use the vanishing point as a spot on the ground and draw towers which vanish and lead the eye downwards.
- Find the center of paper by folding in quarters.
- Draw rectangles or irregular shapes as the top of buildings. Draw guidlelines from the edges of the shapes to the vanishing point. Draw parallel lines approx. 1 cm apart towards the vanishing point between the guide lines. The lines should get closer as they approach the vanishing point.
- Add in details on the tops of the buildings such as a helicopter landing pad or a rooftop pool and garden.
Students can draw a scene using a hole or well by using the same steps as above. They can begin with an irregular shape as the edge of the hole. Guidelines can be drawn from points around the shape toward the vanishing point. These can be erased later. Draw in lines heading toward the vanishing point. Details for the ground such as rocks and grass can be added last. Shading for inside the hole can also aid the illusion.
To see further ideas with perspective and 1 vanishing point, read how to draw and paint murals using perspective to draw you in with students. These can be drawn on walls and other large areas. Chalk drawings on sidewalks can be shown to the students.
The next lesson in the unit should move on to perspective with 2 vanishing points. Streetscapes are ideal images to use for these lessons. See the article on perspective drawing with 2 vanishing points.
This post is part of the series: Thematic Art Lesson Unit Plan on Perspective Drawing
This series outlines how to create perspective drawings with middle years students. The thematic art unit plan has practice lessons for perspective drawings with 1 vanishing point, and 2 vanishing points. Students will enjoy designing a bedroom and a drawing of a streetscape.