A fracture becomes a fault when the rocks on either side of a fracture move in relation to each other. This lab will demonstrate how stress causes this movement along fault lines.
Prelab Discussion
Planning earth science projects is a great way to give students hands-on experience and help with comprehension.
Ask students to read the entire activity, and then discuss these points before beginning:
- Review the differece between tension and compression.
- Give some specific examples of the types of faults being modeled.
- Have students explain what each of the following is modeling: cardboard pieces, boundaries between pieces, the student (blocks of crust, faults, stress forces).
Materials and Preparation
The students will need the following to complete the lab:
- Sheet of corrugated cardboard
- Scissors
- Pencil
- Paper
- Metric Ruler
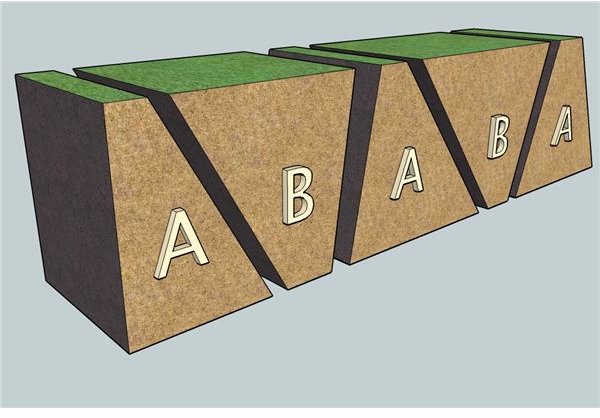
Cut out two pieces of cardboard to match the five shape in this figure. Each piece should be about 6 cm tall. Together they should from a straight line about 25 cm long. Label the shapes with letters as shown in the figure.
Time to complete lab: about 30 minutes.
Procedure
Give each student a copy of the table to record their observations and measurements from the activity.
-
On a flat surface, fit the cardboard pieces together as shown in the figure to the right. Move the pieces together to remove gaps.
-
Measure the total lenght of the assembled pieces, from the left edge of first A piece to the right edge of the last A piece. Record this measurement in both boxes of the first column of the data table.
-
Model normal fault movement by sliding all three A pieces down about 1 cm in relation to the B pieces.
-
Measure the total lengthh of the assembled pieces and record this measurement in the correct column in the data table.
Advertisement -
Model reverse fault movement by moving the A pieces up about 1 cm in relation to the B pieces.
-
Measure the total lengthh of the assembled pieces and record this measurement in the correct column in the data table.
Analysis
Have your students answer or discuss the following:
- How did the length of the assembled pieces change when you modeled normal fault movement? (Modeling normal fault movement should have resulted in an increase in the overall length.) What kind of stress would produce this change in length? (This type of change would result from tension.)
- How did the length of the assembled pieces change when you modeled reverse fault movement? (Modeling reverse fault movement should have resulted in a decrease in the overall length.) What kind of stress would produce this change in length? (This type of change would result from compression.)
- What results would you get using cardboard pieces shaped as squares? (Square pieces of cardboard could move up and down without changing the overall length.)
Conclusion
Write a short paragraph explaining how tension and compression can produce up and down movement in blocks of the earth’s crust. Include an explanation of the importance of the angle of the fault planes.
For a challenge, ask students to experiment with differently shaped blocks of crust. Have them try making cardboard pieces that increase and decrease the angle of the fault planes. Can they model thrust faulting?
This post is part of the series: Plate Tectonics and Earthquakes
A series of labs to help students study and observe plate tectonics and resulting earthquakes