Emphasize to your preschool class that dots are little circles that can become a form of art. This article explores a variety of dot art projects your class will love!
Pointillism
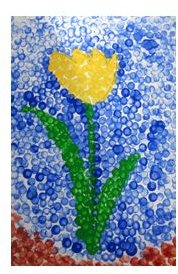
One example of preschool dot art and crafts is a technique called pointillism. Georges Seurat, a French painter who was a leader in the non-impressionist movement of the late 19th century, is the ultimate example of the artist who used pointillism. This art form uses small dots or strokes of contrasting color to create subtle changes in form. For example, to make an area look purple, you would fill it with dots of red and blue. From a distance the dots blend together and look like the color intended. Newspaper pictures are created much the same way. Look at colored newspaper pictures through a magnifying glass and you will see dots. These dots are called pixels.
Have the children plan a picture. Sketch the shapes first and instruct the class to color the shapes using the dot method, placing the points close together. The children can use pointed crayons, colored pencils or fine-tip markers. Display these masterpieces on the wall or bulletin board for the entire class and parents to see.
Polka Dot Pictures
Promote small motor coordination as children pick up punched dots made from construction paper and glue these onto a shape or picture. Older children may wish to punch out the dots themselves.
Materials:
- Construction paper, gift wrap, magazine pages
- Hole punch
- White school glue
- Paper
Procedure:
- Have the children punch holes in paper scraps creating multicolored dots.
- Invite the class to spread glue onto a plain piece of construction paper and sprinkle dots onto it. Think about blue dots can be the sky and white dots could be snow in the winter. Ask the children to talk about the dots they use and what they represent in their picture.
- You may want to cut the construction paper into shapes before giving them to the children. Think about shapes that pertain to specific holidays.
Painted Dots
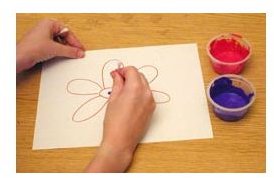
Use paints in different shades of one color to make a dotted picture. Here is an example of shades of green dots.
Materials:
-
Tempera paints in yellow, blue, white, and black
-
Containers to mix small amounts of paint
Advertisement -
Paper plate
-
Cotton swabs
-
Heavy paper
Procedure:
- Encourage the children to create a variety of green shades of paint by mixing blue, yellow, white, and even black in small containers.
- Invite them to put a small amount of each color on a paper plate. This will become their “palates” just like grown-up artists.
- Give the children cotton swabs as painting tools to make dots of color on the paper.
- Warn the children not to mix the shades together, but to slightly overlap or paint the different colors next to each other like “neighbors.”
- This is another way to use the technique of pointillism (see above).
- When the green pictures have dried, these can become background pages where children can glue on cutouts that have been pre-cut or magazine pictures.
These are only a few ways to use preschool dot arts and crafts in the classroom. Read the article, Using Dots for Preschool Arts and Crafts for more ideas using Bingo Dotters.
Photo Credits:


