Learn how to make noisemakers with a patriotic theme. By using reycled water bottles, the children will have shakers they can use every 4th of July.
Parades are a lot of fun…especially 4th of July parades! Your children will be ready to march along as they learn how to make noisemakers, an easy and fun do-it-yourself craft. An added bonus is that they will also have a better understanding of why and how we celebrate the Fourth of July.
Prior Knowledge
Before beginning the activity, talk with your students about why we celebrate the 4th of July. Some may know…some may not. If it appears as if the majority of your students do not know why we celebrate this holiday each year, you may want to read the book “The Story of America’s Birthday ”, by Patricia Pingry. This story is appropriate for use with kids of all ages because it uses simple text to explain the significance of this day.
Next, ask your students to share some of the things they do to celebrate the 4th of July. Answers may include things like watching fireworks, attending picnics with family or friends and participating in special parades.
Expand on the parade concept by asking the children if they have ever been to a parade, or maybe even marched in a parade. Then explain that they are going to have some fun making noisemakers that can be used at the next parade they attend. Tell your class that if they follow directions carefully, there may even be an opportunity to have some parade fun right in their very own classroom!
Materials
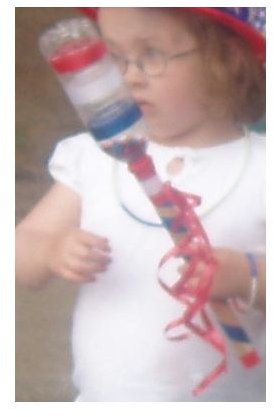
1 empty water bottle (labels removed and caps on) per child
- Red and blue paint
- Paintbrushes
- 2 shoe boxes lined with waxed paper
- Dried lima beans*
- Red, white and blue curling ribbon (enough rolls for small groups to share)
- Red, white and blue electrical tape (enough rolls for small groups to share)
- Scissors
- 1 wood dowel per child (optional) - width should be equal to round opening of water bottle for a snug fit and length should be 1-2 feet
*Red, white and blue beads from your local craft store may be used for these Fourth of July crafts, instead.
Directions
Before beginning, be certain you have all of your materials gathered. Kids - especially young kids - will have a hard time waiting if things are not prepared a head of time!
1. The first step is for your students seperate the lima beans into three piles. The first pile they will paint red, the second pile blue, and the third pile they will leave white. Once the beans are painted, they should be placed in a shoe box lined with waxed paper. Using two shoe boxes seperating the beans by color make it easier for them to dry. Another use of the shoe boxes would be to paint within them. Once the piles are seperated, place all beans that will be blue in a shoe box then have the students paint them there. A light shake will get the beans to turn over. If you are working with older students, a paper plate per color is also a plausible system to use. Once the beans are painted, let them dry.
** You may wish to do the above bean painting the day before or earlier in the day, so that the beans have adequate time to dry**
2. Give each student their own water bottle. Have students sit in small groups so that materials may be shared. Give the small groups of students rolls of red, white and blue electrical tape. These will be used to make stripes around the middle of the water bottle. One stripe of each color should suffice. (You may want to demonstrate first how to tape the end down at one spot on the bottle and then slowly guide the rest of the tape around the bottle to make a stripe. Provide assistance as needed.)
3. Have students cut red, white and blue curling ribbon to a variety of lengths (between 6" and 18".)
4. Help students tie the curling ribbon strings around the mouth of the water bottle. Be sure to have at least 2 ribbons in each color.
5. Let the students fill the water bottle 1/3 of the way full of Lima beans in red, white and blue.
6. If you will not be using the dowels to make the noisemakers, simply instruct the children to screw the cap back on the water bottle.
7. If you will be using the dowel, help students insert their dowel into the opening of the bottle - at the mouth. It should be a snug fit.
8. Once again using the red, white or blue electrical tape students will wrap around the mouth of the water bottle to cover where the ribbons have been tied and to secure the dowel in its place.
9. The electrical tape may also be wrapped around the dowel to decorate by repeating the same red, white and blue pattern created on the bottle itself.
10. Now that your students have learned how to make noisemakers, and this July 4th craft is finished, the kids are ready to shake, shake, shake!
Extend
With a little imagination, you can extend the learning after completing the craft. For kids, the real fun will begin when you put on some patriotic music and march around the room together!
References
- The images offered in this article are the author’s own
This post is part of the series: Fourth Of July Crafts for Kids
Create fun crafts that will make your Independence Day celebration special!


