Whether you are celebrating Earth Day, Arbor Day or just the four seasons, trees can be the center of attention for a theme unit. Trees play a vital role on this earth, as they all serve an important purpose. Here are three fun crafts about trees for your class to make.
Four Seasons Trees
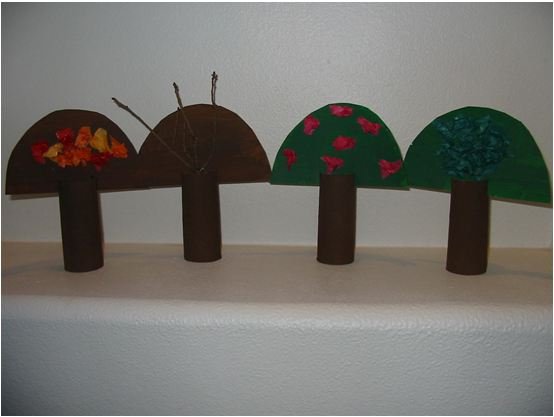
How well do your students understand the four seasons? Using trees as tools, make this craft to show the children how trees look during the weather changes.
You will need:
- 4 cardboard toilet tubes
- Poster board
- Tissue paper in colors
- Glue
- Safety scissors
- Brown paint
- Green paint
- Paintbrushes
- Small twigs
Directions:
- You may want to do this as a group project or individual activity if you have enough materials.
- Paint each of the four toilet tubes brown to represent the tree trunk. Set these aside to dry.
- Cut four semi-circles from poster board. Paint two brown and two green. Also, let these dry thoroughly.
- Take each cardboard toilet tube and cut a small slit on each side of one end. Insert a treetop inside the slits on each brown tube.
- Now, have the children cut or tear small squares from tissue paper. You will need red, yellow, and orange for fall leaves; a pink shade for spring blossoms, and green leaves for summer.
- Take each square and crumble it into a wad and glue this onto the appropriate treetop.
- Adhere small twigs onto the winter tree.
Line up your four seasons tree props and then discuss each season’s weather and trivia facts.
Spring Tree Sponge Painting
Your students will truly enjoy this sponge painting activity using tree shapes and spring colors.
You will need:
- Cardboard sheet
- Pencil
- Sharp scissors (adult use only)
- Tempera paints in spring colors
- Household sponge cut into squares
- Paper plate
- Blue construction paper
- Brown construction paper (or grocery bag)
- Glue
Directions:
- Draw several tree shapes onto the cardboard. An adult can carefully cut out the shapes.
- Place this template onto a sheet of blue construction paper. You may need to tape this down on the paper.
- Squeeze a small amount of paint (a spring color) onto the paper plate.
- Show the children how to dip the sponge square into the paint and press it down through the template to make prints. Continue to sponge print all the trees on the template. If you change colors you will need a new sponge per color.
- Let the paper dry and carefully lift the template off the blue background.
- Cut small tree trunks from brown paper and glue these in place.
Craft Stick Button Tree
Young children love to play with buttons. This craft constructs a tree shape with the sticks and then your students can decorate it for either spring or fall with buttons.
You will need:
- Four wooden craft sticks
- Green paint
- Brown paint
- Green felt (craft foam or fabric)
- Buttons (pastel colors for spring blossoms or fall colors for autumn leaves)
- Heavy-duty glue
- Paintbrushes
Directions:
- Have the children paint three sticks green and one stick brown.
- When dry, glue these in a triangle shape. Glue the brown stick as the tree’s trunk.
- Lay this triangle on top of the green fabric and glue it in place. Trim off the excess.
- Decide whether you are making a spring tree or fall tree. Invite the kids to glue on buttons in the appropriate colors.
For more theme units on trees, check out these articles from Bright Hub Education:
Kindergarten Science Lesson Plan: Trees and the Four Seasons
Season and Tree Unit: Lessons All About Trees Through the Seasons for Primary Grades
References
- Craft photos courtesy of Tania Cowling, all rights reserved
- Spring Trees adapted from Arts & Crafts All Through the Year by Rozanne Williams
- Craft Stick Button Tree adapted from Crafts for All Seasons: A Hands-on Celebration of Seasonal Craft Activities by Tania Kourempis-Cowling (1997)


