Students will investigate the concept of angles and determine the measurement of angles using a cut-out of a one-degree of a circle.
Identify a “one-degree angle” as an angle that turns through 1/360 of a circle. This angle can be used to determine the measurement of angles. Go to the bottom of the article to download a copy of the lesson.
Lesson Objective: The lesson is aligned to the Common Core State Standards for Mathematics – 4MD.5a and b Geometric Measurement – Recognize angles as geometric shapes that are formed wherever two rays share a common endpoint.
Materials Required: Cutout of one-degree angle
Lesson Procedure:
Identifying Measurement of an Angle using a “One-Degree Angle”
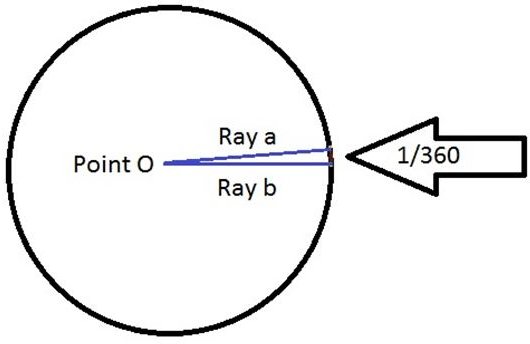
Look at the circle below. Point O is the center of the circle. Both Ray a and Ray b share a common endpoint, Point O. Ray a and Ray b form an angle. Ray a and Ray b are the sides of the angle. The angle on the circle turns through 1/360 of the circle. This angle is called a “one-degree angle”. This angle measures one degree.
Student Work
Cutout the “one-degree angle” above. Use the “one-degree angle” to draw angles with the following measurements.
- On your paper, draw an angle that measures 3 degrees.
- On your paper, draw an angle that measures 5 degrees.
- On your paper, draw an angle that measures 8 degrees.
- On your paper, draw an angle that measures 10 degrees.
Individual or Group Work:
Use the “one-degree angle” that you cutout from the activity above to draw angles with the following measurements.
- On your paper, draw a circle. Label the center of the circle with Point O. Draw Ray a and Ray b to form an angle with endpoints at the center of the circle and measures 2 degrees.
- On your paper, draw a circle. Label the center of the circle with Point O. Draw Ray f and Ray g to form an angle with endpoints at the center of the circle and measures 4 degrees.
- On your paper, draw a circle. Label the center of the circle with Point O. Draw Ray m and Ray n to form an angle with endpoints at the center of the circle and measures 7 degrees.
- On your paper, draw a circle. Label the center of the circle with Point O. Draw Ray p and Ray q to form an angle with endpoints at the center of the circle and measures 9 degrees.
Answer the following two questions for each of the shaded angles shown below.
- How many “one-degree angles” did you use to measure each of the shaded angles?
- How many degrees do the shaded angles measure?
Answers:
- Students should trace around the “one-degree angle” three times to draw an angle that measures approximately 2 degrees.
- Students should trace around the “one-degree angle” five times to draw an angle that measures approximately 4 degrees.
- Students should trace around the “one-degree angle” eight times to draw an angle that measures approximately 7 degrees.
- Students should trace around the “one-degree angle” ten times to draw an angle that measures approximately 9 degrees.
- 14 “one-degree angles”, 14 degrees
- 28 “one-degree angles”, 28 degrees
Students should be able to draw and measure angles with a specified measurement using a model of a “one-degree angle”.
Download a copy of the lesson.
This post is part of the series: Finding the Measurement of Angles: 4th Grade Lessons
These three lessons will have students learn to find the measurement of angles by using protractors, addition and subtraction. These math lessons all meet Common Core objectives.


