Students will find this 3D art lesson plan uplifting! Encourage their creativity and teach them new and exciting art and photography techniques.
This high school art lesson plan can be modified to fit an art class, photography class, or digital photography class (see modifications at the end for art/digital classes). Students will create a layered 3D photograph from prints they develop. This is a perfect project for students to work on in the classroom while classmates take turns in the darkroom.
The Traditional Photography Activity
Materials
- several prints or copies of a photograph containing objects in the foreground, middle ground, and background.
- light weight cardboard.
- scissors and/or exacto knives.
- glue or glue dots.
- pencils.
Procedure
- Students should choose a negative that has a foreground, middle ground, and background. They should select an image that has depth and objects they can bring forward.
- When they make their prints they should do test strips and develop their photos as normal. They should develop two or three prints depending on the level of layering or number of objects they plan on making three dimensional.
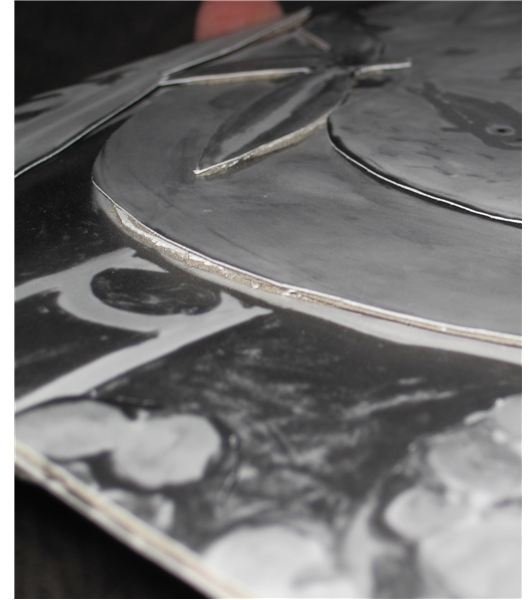
- Once their prints are dry, they will cut out the images they are going to build up and trace them onto cardboard. They should keep one photograph intact as a base on which to glue other images. Depending on where the image falls within their composition, they will need to trace two or three layers of cardboard out.
- They will then cut out the cardboard shapes and glue their cut images to the cardboard. Students should be precise about tracing and cutting out their images and cardboard. The cardboard should be the exact shape of the cut image.
- When the shapes dry, arrange and glue the layered images to their corresponding base. The objects that are the closest may require additional layers of cardboard.
What They Will Hand In
- One 8 x 10 (or 5 x 7) 3D photograph with at least 3 levels of dimension.
Modifications for Digital Photography
The process works the same as a photography class minus the darkroom setting. Students should select an image they have taken to make into a 3D photograph. If images are printed from a color laser printer, students will need to glue the base image to cardboard for stability. As a variation, students might choose to create a layered composition from two different photographs of theirs.
Ideas for a drawing or studio class:
- Have students create a work of art (drawing or painting) with objects in the foreground, middle ground, and background or draw from a still life. Once the drawing is complete, scan and print several copies of the original. Follow the technique in the original lesson to make their drawings 3D.
- Students should find a famous work of art with depth and dimension. Print out several copies and follow the same procedures as the original lesson.
- Students should find several images from magazines that would work together in a composition. They can follow the original layering technique to create a 3D photograph or they can glue all the images into one image, scan it, and print it out in black and white to help unify the images from the different sources. This image is what they would use to follow the layering process.
Sample Image
(click to enlarge)