Land and seascapes have been popular visual subjects for centuries. Using a few basic rules, your students can capture the wonder and beauty of their favorite outdoor places in one or two quick painting sessions.
Learning Objectives: Students will identify components of simple landscape or seascape paintings and use basic drawing rules to complete their own land or seascape art.
Materials:
- Small drawing paper (copy paper works too)
- Large drawing paper
- Choice of media for drawing and painting (watercolor, oil pastels, tempera paint, etc.)
- Ruler
- Sample photos of land and seascape art (enough for each student or pair of students to have their own photo– each photo should have a visible horizon)
Lesson Procedure:
Optional pre-lesson preparation: have students bring in photos of places they find attractive (preferably with few or no visible structures and some sky included).
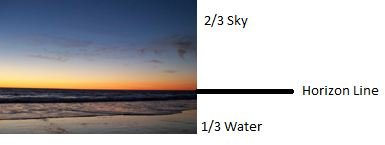
Step One: Hand out sample photos and ask students to measure the height of the photos. Students will then identify the horizon line in each work, and measure the distance from the bottom of the photo to the horizon. Students can use these measurements to decide whether or not their photos follow the rule of two-thirds that is popular in land and seascape art. Ask students to share whether or not their photos follow this rule and explain their reasoning.
Rule of two-thirds: Land and seascapes should be either 2/3 sky and 1/3 land or water, or 1/3 sky and 2/3 land or water.
Step Two: Ask students to hold their rulers against the horizon lines in their photos. Students should note that the horizon line must be absolutely straight to achieve a successful picture.
Step Three: Using either their own photos or those provided by the teacher, students will create practice sketches to lay out their landscapes or seascapes. Students can either use rulers or fold their papers into thirds to identify where they wish to place the horizon line. Then they can begin drawing in any elements they would like to add such as mountains, water, trees, grass, etc. Emphasize that students should keep the composition simple.
Step Four: Once students have completed their smaller sketches, they can begin working on their larger pieces. Ask students to begin with the horizon line in their pieces before adding any other elements, and to make sure they have followed the two-thirds rule.
Tips to remind them of during this stage:
- Use a ruler for the horizon line! Nothing ruins a picture like a crooked horizon.
- If adding water, remember that water is always horizontally straight. If the water does not meet the horizon line, it still must have its own straight horizon at its edge.
- Keep the composition simple! Big skies, open water, wide fields make a landscape powerful.
- Larger objects come forward, smaller ones recede.
- When using color, add blue to the objects that are furthest away helps them appear to recede.
- If coloring sky, make the sky darkest at the top and gradually lighten it as it meets the horizon.
- Enjoy yourself! Use big brushes and big sweeping strokes to make your picture more powerful.
Step Five: Have students post and share their work when finished.
Assessment: Landscapes should be graded on their success in meeting two criteria for this project: 1) using the two-thirds rule and 2) straight horizon lines.
The two-thirds rule works in photography too! Students who enjoyed this activity should be encouraged to take their own reference photos for future paintings.