Preschoolers are fascinated with kites. Help them create their very own kites which are unique, just like them!
Learn to Fly High
If you are looking for a fun and personal kit craft for a March, wind or kite unit, then this preschool kite craft is perfect. Capture a moment in time and offer your students the opportunity for hands-on learning about kites. Let you and your students’ imaginations take flight!
A Kids in Flight Kite
Materials Needed:
_
Pre-cut butcher paper or white paper table cloths (one per child)
Dark marker to outline shape
Colorful crayons or markers
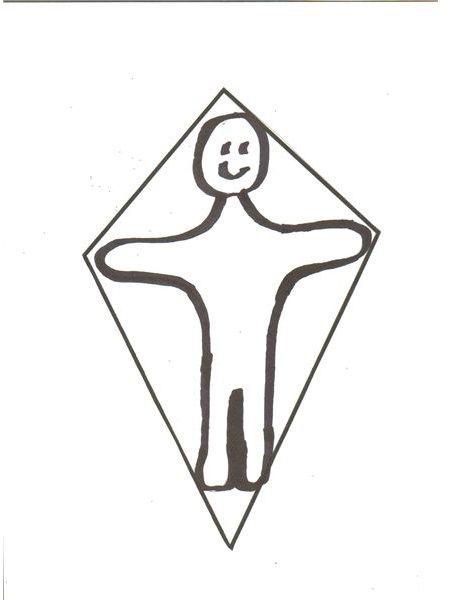
This craft captures a moment in time, and offers hands-on learning to your students on how to create a kite. Start by handing out the butcher paper to each child. You may need to combine several pieces of the paper together in order to span the width and length of a child, or use white paper table cloths instead of the butcher paper as they will be large enough. Have the paper pre-cut into the traditional diamond shaped pattern of a kite. The kite will span the length of a child from head-to-toe, and will need to be extended from fingertip-to-fingertip, so make sure your paper will fit these dimensions.
Lay the paper on the ground and ask the student to lie on top of the paper. Then have them hold out their arms so they touch the corners of the kite. Likewise have them place their legs together so they fit near the lower point of the kite. Outline your students’ bodies onto their kite. Their body shape mimics the cross usually created with wooden sticks on a traditional kite. Once this is completed, ask the children to create self-portraits using the markers and crayons you have provided.
Finally hang up the finished versions of the kid-kites throughout the room, and allow the children to see themselves “in-flight!”
A Personal Popsicle Kite
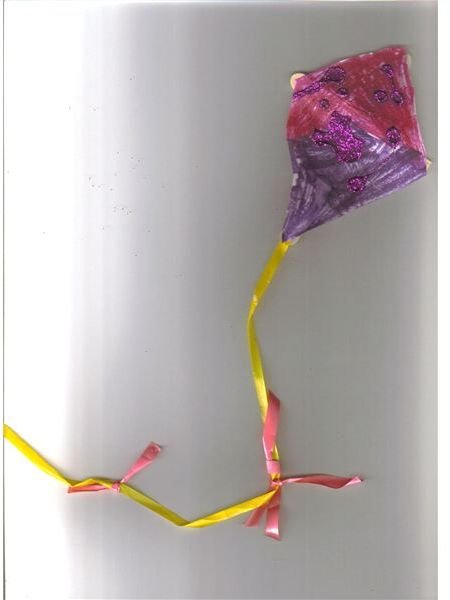
Materials Needed:
Popsicle stick: whole (one per child)
Popsicle stick: half (one per child)
Paper with a diamond shape (one per child)
8" Ribbon (one per child)
2" Ribbon (two per child)
Markers or crayons
This is a simple craft project that will allow your students to be able to play with a kite that fits in the palm of their hand! Pass out the sheet of paper with the diamond shape. Ask the students to try to cut out the shape using safety scissors. Some children may need help with this step. If this step is to difficult have extra pre-cut kites available.
Once this step is complete, have the children decorate their finished craft using crayons or markers. Hand out one whole and one half Popsicle sticks to each child along with the 8" piece of ribbon. Help them glue the pieces together in a cross pattern. Have a finished model available for reference. Then, glue the ribbon to the bottom point.
Next, glue the newly decorated kites to the cross so that the ribbon is between the stick and the kite.
Finally, tie the two 2" ribbons to the tail of the kite. You could have the children attempt this step as well, however many will need your help. Once these kites are completed, your students will have a kite they can fly around all by themselves!
A Window Kite Decoration
Materials Needed:
Pre-cut black diamond shape with 4 triangle “windows” (one per child)
Multicolored tissue paper triangles (four per child)
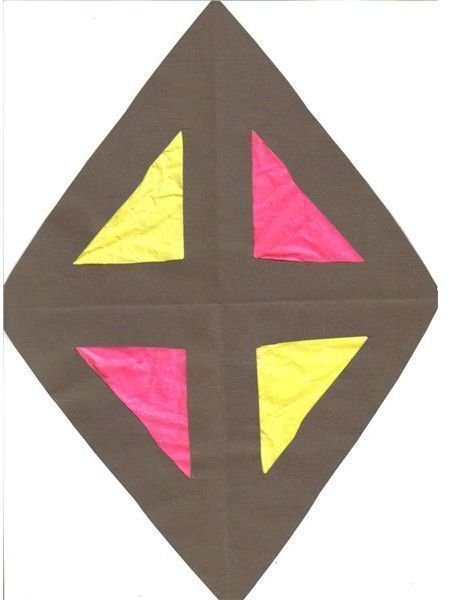
This is a great craft that can be used later on as a window decoration! Begin this craft by passing out the pre-cut black diamond shape with the four triangle “windows.” Have the children choose four tissue paper triangles. Make sure these triangles are bigger than the windows on the kite. Once the four colors have been chosen, help the students glue the tissue paper to the back. Once the glue has dried your students will have a beautiful kite that will be a great addition to any bedroom or classroom window!
The Sky’s the Limit
Your students will have a blast creating this preschool kite craft, as well as the other two bonus craft options. These crafts will be a welcome addition to any kite themed unit lesson plan. Once you try your hand at kite making, who knows where your imagination will go!
Safety Disclaimer- supervise closely whenever using small or sharp objects with young children.
Source: Personal experience- for classroom or personal use only
Photos by author, all rights reserved


