What do you have to be thankful for this year? Teach your preschoolers about the spirit of Thanksgiving through these creative crafts using all kinds of materials. From toothpicks to walnuts to plastic gloves to pine cones, there is something fun to make that will fit any classroom budget.
Let Us Give Thanks
Sir John Templeton once said, “How wonderful it would be if we could help our children and grandchildren to learn Thanksgiving at an early age. Thanksgiving opens the doors. It changes a child’s personality. A child is resentful, negative—or thankful. Thankful children want to give, they radiate happiness, they draw people.”
Use these Thanksgiving craft ideas to help teach your students about this special day and bring Mr. Templeton’s vision to fruition.
It’s Turkey Time!
Tom Turkey is the epic symbol of Thanksgiving and there are a plethora of ways to create him . Below are just a few ideas to help your preschool students with fine motor skills, cultural awareness and even socialization through painting, cutting, gluing and stuffing (and not the kind you eat!)
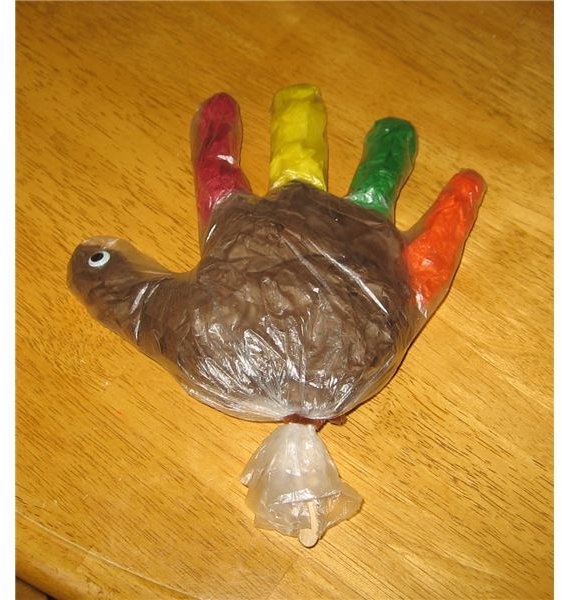
Turkey Puppets
**
Materials:
- Plastic glove (the kind for food preparation - not powder-coated latex)
- Brown, red, yellow, green, orange tissue paper (other colors may be used if desired)
- Popsicle stick
- Googly eyes
- brown pipe cleaner or twist tie
- Orange pipe cleaner
Directions:
- Provide students with a variety of tissue paper colored squares or sheets. They will need more brown than the rest of the colors.
- Have them roll up the tissue and stuff each finger with a different color. Brown should be used for the thumb.
- Have them roll up brown tissue paper to fill the palm part of the glove.
- The teacher can then take the popsicle and wiggle it between the sheets of paper in the palm to make a puppet.
- The teacher then twist ties the pipe cleaner to get the glove to stay together.
- The students can then glue on one googly eye on the thumb. If you want to make feet, you can use orange pipe cleaner as an option and stick them in the glove at the bottom.
Voila! You have a fun and cute stick puppet they can enjoy!
A Thankful Turkey
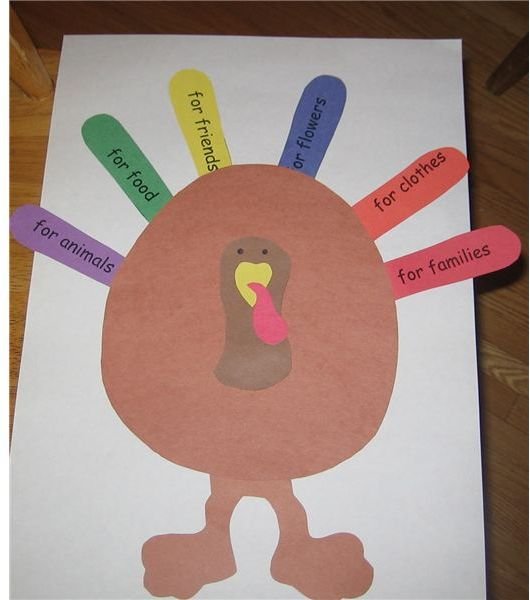
Materials:
- Pattern for the turkey body, feet, head and feathers
- An assortment of colored construction paper (for feathers) and brown (for the body)
- A Black Sharpie
- Scissors
- Glue
Directions:
- Prior to student interaction, you can have an array of feathers traced and precut by using the pattern above. Each student will need 5 feathers. If you have an advanced group, you may choose to have them trace and cut their own feathers.
- Have students trace the turkey’s body from the pattern above onto brown construction paper. Then, have them cut it out.
- Provide the feet (precut from brown paper) and the head (precut from darker brown paper) and have them glue onto their turkey body as shown in the picture.
- Then have the students either draw a face or if you have time, you can precut a triangle for the beak and precut the wattle (red piece of skin that hangs down) out of red construction paper and have them glue on.
- Then they are to choose 5 colored feathers for their turkey. Ask them what they are thankful for and write those 5 things on their feathers (i.e. food, family, friends, pets, clothes, etc.)
Food…Glorious Food!
Some will say the best part of Thanksgiving is all of the wonderful food that fills our tummies and warms our hearts. Share some of the bountiful Thanksgiving traditions first brought to us by the Pilgrims and Native Americans through these food crafts that will make your taste buds tingle and mouths start to water!
A Piece of Pumpkin Pie
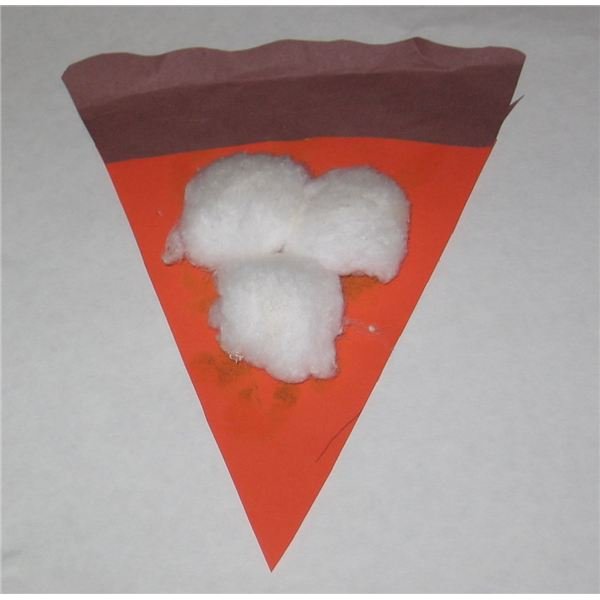
Materials:
- Orange construction paper
- Brown construction paper
- Pie pattern
- Ground cinnamon
- Scissors
- Glue
- Cotton balls
Directions:
- Have children trace the pie pattern on to orange construction paper. Then, have them cut it out.
- Have them dribble glue in a few spots on the pie (They may need assistance with this part.)
- Then have them gently sprinkle cinnamon onto the glue just as they would with glitter. Shake excess off over table or sink.
- Have them glue on precut pie crusts made from brown construction paper. (as seen in photo)
- Have students glue on 3 cotton balls in the center of the piece of pie for the whipped cream.
Fingerprint Flint Corn (also known as Indian corn or calico corn)
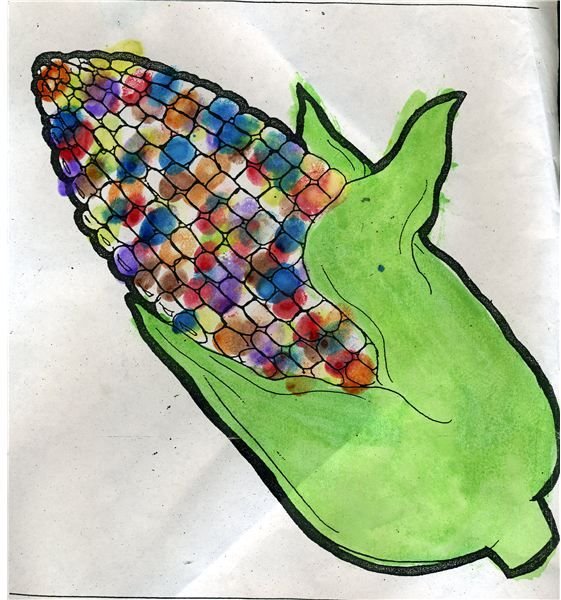
Materials:
- Printable of corn on the cob or flint corn (close to the one in the picture )
- Watercolors
- Paintbrush
Directions:
- Pass out a copy of the printable to each student.
- Have them watercolor the husk green or brown; their choice.
- Have them use their fingerprints to make the different colored kernels of corn. I would suggest yellow, brown, black, red, orange, purple, blue, etc. as flint corn comes in a variety of colors.
- The teacher should then cut them out and glue them onto brown or black construction paper.
Note: Other options for this craft include using colored popcorn kernels or you can have the students paint plain ones different colors. Also, you could use rolled up colored tissue paper and glue on or even colored beads
The Pilgrims Meet the Native Americans
The Pilgrims landed November 21st, 1620 at Provincetown, Cape Cod; but it wasn’t until December 21st, 1620 that they settled at Plymouth Rock, Cape Cod, Massachusetts. From there they created their own government and suffered their first long, hard winter. Local Native Americans show the pilgrims how to plant crops, fish and trap food in order to survive. To celebrate and give thanks, they feasted together on their bounty - a day we now call Thanksgiving.
Teach your students about the history of this famous gathering and celebration of life’s true gifts through these Pilgrim and Native American crafts.
Pilgrim Plates
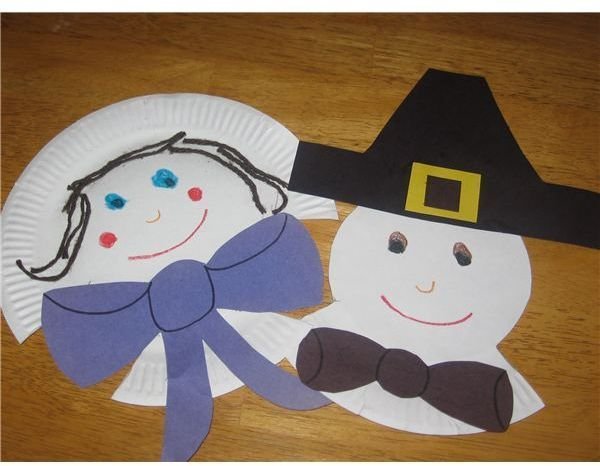
Materials:
- 2 Paper plates per child
- Paper plate Pilgrim patterns
- Pattern for bow ties (for both man and woman)
- Pattern for Pilgrim hat (man)
- Yellow construction paper squares for buckles and small black squares for the middle of the buckle
- Blue construction paper
- Black construction paper
- Markers or crayons
- Different colored yarn
- Scissors
- Glue
Directions:
- Either have students trace and cut out the plate patterns for their Pilgrim people or you can choose to have them precut ahead of time if the cutting is too advanced. The Pilgrim hats, bows and buckles should already be traced prior to starting.
- Have them cut out the Pilgrim hat and bow ties for the woman and man.
- Have them cut out the yellow and black squares for the buckle or you can have these precut as well.
- Then have them glue on their hats at the top of the man paper plate and glue the black bow tie at the bottom. The buckle (yellow square) should be glued onto the bottom center of the man’s hat.
- Then have students glue on the blue ribbon or bow at the bottom of the woman plate. They can then glue on hair using piece of yarn around the edges of the plate.
- Then have students draw faces on each one with crayons or markers.
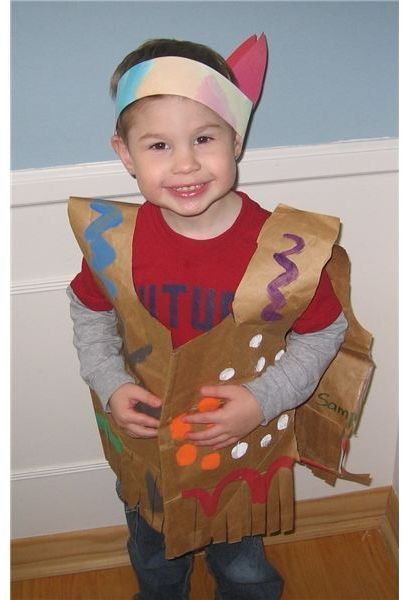
Native American Vests and Headbands
Materials:
- Brown paper grocery bag
- Tempera paints
- Paintbrushes
- Printable Native American symbol sheet
- Scissors
- Watercolors
- Glue
- Feather pattern
- Colored constructions paper
Vest Directions:
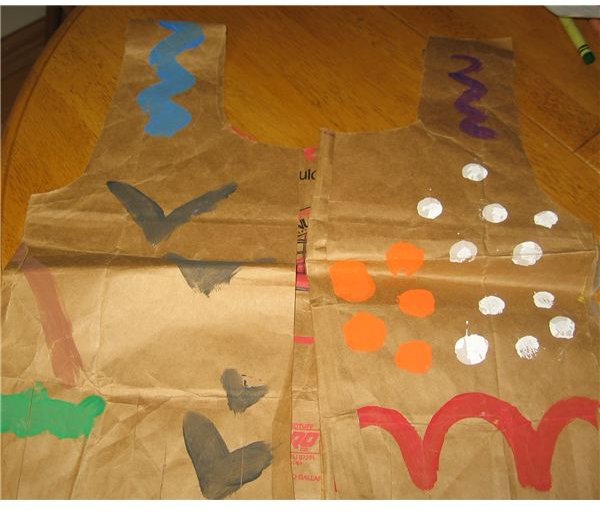
- Take large brown paper grocery bag and lay it flat with the flap on the bottom facing up.
- Then staple the flap down to the back of the bag, but making sure that the staples only go through the front, otherwise it won’t open.
- Then cut through the bag at the bottom edge in a half-moon shape creating the neckline.
- Then cut vertically down the middle of the bag to create the vest opening.
- About an inch or two down, cut half moons on each side for arm holes.
- Turn the bag inside out to hide the writing on the front.
- Make fringe at the bottom of the vest by cutting up a couple of inches in strips, making sure to not cut them off completely. Use the printable to make large Native American sign cards for the students to copy and paint on their vests - both front and back.
Headband Directions:
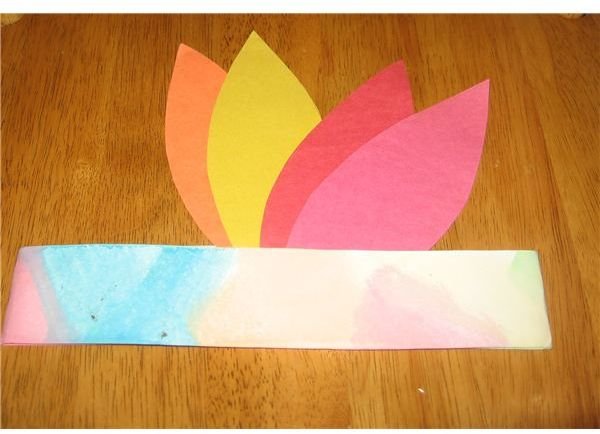
- Have strips of tagboard already precut for students to paint.
- Students will water paint their headbands. Let dry.
- Each student will trace and cut out 4 feathers for their bands. Allow them to choose from several different colors.
- Have them glue on the feathers to the inside backs of their bands.
- Staple the bands to fit their heads.
For an added craft idea, you can have your students make wampum by using yarn, small, shape cutouts in a variety of colors with a hole punched through the middle, cut up colored straws and painted uncooked noodles. The students can string the noodles, straws, and construction paper shapes through to make a wampum necklace to wear with their vests and headpieces.
The Voyage of the Mayflower
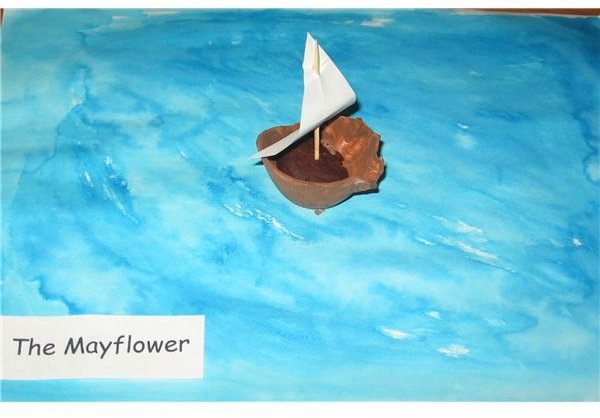
Here is a simple and easy craft that represents the journey the Pilgrims took to get to America. Typically, the boat is made using a walnut, but if they are not in season, an egg carton will do. The egg carton is a nice option to use with students with nut allergies.
Materials:
- Egg cartons
- Brown poster or washable paint
- Paintbrushes
- Play-Doh or clay (a small amount)
- Toothpicks
- White paper triangles
- Watercolors
- White construction paper
- Pre-made labels that say “The Mayflower”
Directions:
- Have students paint a piece of white construction paper blue and let dry.
- Provide each student with a precut egg carton section cut evenly around if possible. (This is where the walnut half shells would be used.)
- Have students paint their egg cartons brown, inside first and let dry. Then have them paint the outside brown and let dry as well.
- Once dried, give each student a small ball of clay to push inside their boats.
- Pass out one paper triangle to each student and one toothpick. Show them how to stick their toothpick through the paper to make a sail. They will need assistance with this.
- Then stick the toothpick inside the clay or Play-Doh and their boat is complete.
- The students will then glue the boat to the middle of their dried blue paper representing the ocean and they can glue on their labels.
This craft is adorable when finished!
A Celebration of Thanksgiving
There is a great deal of history involved in this special holiday and with it comes a discovery of new land, new people, new food and new traditions for many years to come. Celebrate the spirit and the true meaning of this day in time with your preschoolers by creating this very special bracelet keepsake.
Materials:
- Colored beads
- Elastic
- Scissors
- Index card or card stock
Directions:
- Provide each student with a piece of elastic long enough to fit around their wrist.
- Following the color order below, have students string their beads, one at a time. (Taping the string to the table will prevent the beads from falling off.)
- Then tie the ends together while on their wrist creating a completed Thanksgiving bracelet.
- Print copies of the meanings of the beads for the parents.
Thanksgiving Bracelet Meaning
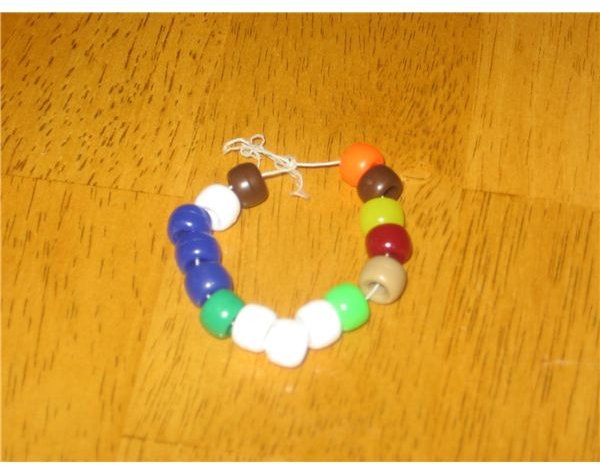
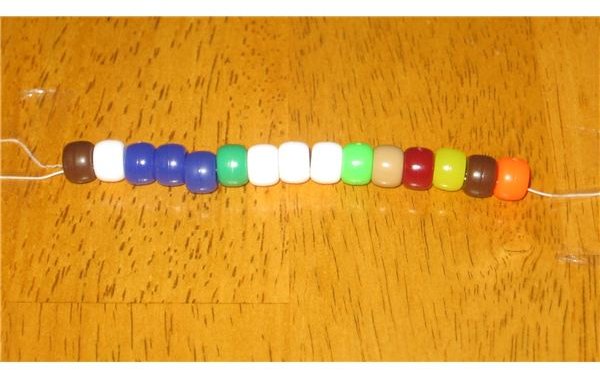
- 1 brown bead represents the Pilgrims’ departure from England for religious freedom
- 1 white bead represents the sails on the Mayflower
- 3 blue beads represent the long ocean voyage
- 1 green bead represents the Pilgrims seeing land for the first time
- 3 white beads represent the long, hard winter
- 1 green bead represents the arrival of spring
- 1 tan bead represents the Native American
- 1 red bead represents cranberries
- 1 yellow bead represents corn
- 1 brown bead represents turkey
- 1 orange bead represents pumpkin
Gobble Up Learning
With the help of these fun crafts, preschool students will become more culturally aware of special traditions, history, and learn the importance of being kind and giving thanks. Integrate them into your history, art, reading and language arts lessons and activities and watch how your little ones gobble up learning! If you have any other ideas, feel free to share below.
References
- Author’s personal teaching experience in addition to mentor teacher’s shared teaching experiences.
- All images in this article were created by Sarah Malburg, all rights reserved.
- A Brief History of the Mayflower, http://www.langeonline.com/Heritage/Mayflower.htm
- Thanksgiving Quotes, http://www.allabouthistory.org/thanksgiving-quotes-faq.htm


