This is a clay lesson plan for middle or high school students. Hand-building techniques and proportion sculpting will be used to create realistic ceramic self-portrait sculptures.
Preparation
**
C****onceptual Basis for Lesson:
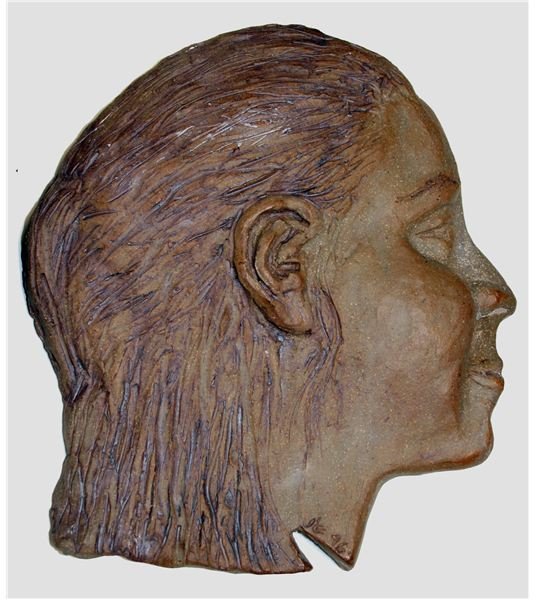
Through portraiture in clay, students will use hand-building techniques and proportion in order to create a realistic work. Students will produce a ceramic, self-portrait sculpture in profile.
Art Resources:
Self-portraits/portraits done by various artists including: Chuck Close, Andy Warhol, Van Gogh, Picasso, and Egyptian art. May include Gilbert Stewart, Matthew Brady, Aikens, Sargeant. Also coins which contain facial profiles.
Instructional Equipment:
Camera and film or digital camera and printer to take students photos in profile.
Art Materials:
Paper, pencils, clay, clay tools, shoe polish, acrylic paint, plastic bags, water.
Vocabulary:
- Self-portrait - a picture/drawing/photograph done of a person by that person.
- Proportion - the size relationship between one part of the whole and one part of another.
- Realistic - looking true to life.
Students may also need clay vocabulary depending on how much knowledge they have of clay.
Motivation for Lesson:
Class discussion about portraits/self-portraits and viewing the works of selected artists. Students have their photographs taken, in profile and view coins.
Discussions and Demos:
Portraits Topics: Discuss the different styles, reasons, and mediums involved in portrait making. When creating their portraits, student need to pay attention to lines, proportions, and shapes.
Working with Clay Topics: What clay is made of, importance of working with clay to eliminate air, how to roll out slabs, using tools for texture, creating something with dimension and not flat. How to properly store clay and what air will do.
Coloring: Instead of using glaze, after the clay has been fired students should add color with watered down washes of acrylic paint for a realistic look, or brown shoe polish to give it a more natural look and to help add definition to details.
Requirements:
- Size: Finished portraits should be no smaller than 8 x 8 inches. Remind students that clay shrinks when it is fired.
- Sketches: Must be size of portrait and realistic, before working with clay.
Process
Steps:
- Students will draw a sketch of themselves from their printed profile photo. The sketch should include the whole shape of their head.
- They will then roll out a slab of clay (students should be reminded about rolling out a slab of uniform thickness), place their sketch on top of the clay, and using a clay tool or pencil, trace over their sketch to leave an impression on clay.
- With clay tools, they will “cut out” their profile from clay and begin adding and taking clay away to match their facial features and create a 3-D surface on their slab.They should use their photo and sketch as references.
- Toward the conclusion of the lesson, students will need to carve away some of the back if they wish to create a notch for hanging or if clay is too thick. (This requires letting the clay harden a bit.)
- Clay is fired and students add coloring.