This is a very interactive lesson plan on simple machines that you can conduct in your class. Check out the crossword in the end, your students will love it!
Simple machines can be a very interesting unit to teach your children. Machines are something the students are always exposed to and are always excited about. Use this lesson plan to make this an all more enjoyable experience for you and your class.
Begin by discussing with your class - what is a machine? What is the purpose of a machine? Have them give several examples of machines and how they serve their purpose of making our lives simpler.
Now introduce them to the concept of simple machines by giving the following background :
But all these machines are composed of basic building blocks - these are the simple machines. Write down the definition of a simple machine on the board.
Definition: A simple machine is a mechanical device that makes our work easier by changing the direction or magnitude of the effort or force required.
A lot of machines that we see around us are fairly complex. These machines made by combining several simple machines are called Compound Machines.
The 6 Simple Machines
Your students may not be familiar with the concept of force. So elaborate upon the definition by using the following examples:
-
On a see-saw, as one person goes down, the person on the other hand goes up. So, the direction of force is changed here. The downwards force applied by the first person is converted to an upwards force on the second person.
-
It is easier to climb up a staircase than to climb up a ladder, even though the ladder is a shorter path. The stairs change the magnitude of force required to climb up the stairs.
Write the names of the 6 simple machines on the board, along with what their basic purpose is. Tell them that they might have heard of these before. Ask them for examples if they have. Here goes the boardwork.
- Pulley: changes the direction of force.
- Inclined plane: raises objects by moving up a slope.
- Lever: moves around a point to increase or decrease effort.
- Wedge: cuts through objects.
- Wheel and axle: reduces friction between moving parts.
- Screw: holds things together or lifts things by changing circular motion to motion in a line.
Demonstrating the Simple Machines
Now, one by one, show them each one of the simple machines using pictures, demonstrations and examples. Demonstrating some of these is relatively easy, the rest might take a bit of effort. Call one or two students per demonstration in front of the class to test the change in force themselves.
- Pulley: Fix a pulley to a wooden stand. Pass a rope over it. Tie a load at one end. Pull it downwards from the other side. The load is pulled up.
- Inclined plane: Get a very heavy load. Ask the student to lift it. Make an inclined plane by putting a wooden board slanting on a thick pile of books. Now ask the student to move it up using the inclined plane.
- Lever: Demonstrate how you can lift a heavier load on the other end by a small load on one end of the ruler set on a fulcrum.
- Wedge: Explain how an axe easily cuts things.
- Wheel and axle: Get a screw driver. By rotating the larger diameter handle, the screw can be easily removed with lesser effort.
- Screw: Get a screw and a soft wooden block. Make them insert the screw in the board using the screw driver.
An Activity For The Class
Ask your students to work in groups of 3 or 4 each. Each of the groups must make a list of 7-10 examples of simple machines around them. Each of the machines should include the following description:
- Name of the device
- The job that is made simpler
- The simple machine(s) used, as understood by the students.
- Any suggestions for changes that might make the machine better.
At the end of the activity, you can discuss some of the nice ones in the class.
How Do Simple Machines Work?
Explain to your students how simple machines work by introducing the concept of Work as follows:
Simple machines seem to be doing some magic as they help us do things with lesser effort. But infact, there is a trade off - by decreasing the effort to complete the task, we are infact applying the effort over a greater distance.
Completing a task requires work. The work done in a task is a product of the force(effort) and the displacement (distance). The work for a task remains the same or, constant, by whichever method we do it. So, if we decrease the effort we must apply it over a greater distance so that their product, the work, remains constant.
Mechanical Advantage
Define and explain M.A. as follows
The decrease in the required effort is expressed in numbers by the term Mechanical Advantage. It is given by ’the load moved divided by the effort applied'.
For example, for the simple pulley shown in the demonstration, the mechanical advantage is 1 since the weight lifted is equal to the force applied. Also show them the M.A. of the lever you had shown.
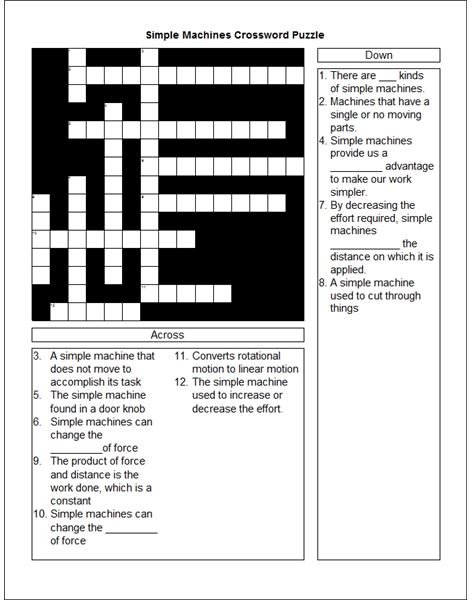
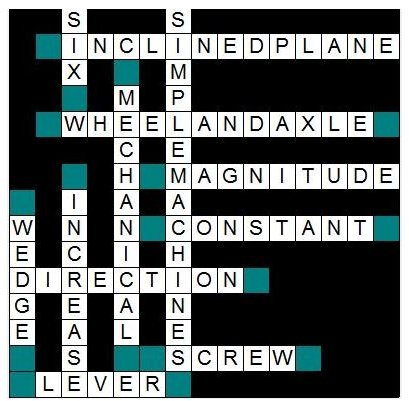
Exercise : A Crossword Puzzle
Here is a crossword puzzle on Simple Machines. Print out and ask the students to work on it in pairs. Give them 15 minutes to do it.