Kids love holidays, but some months like September do not have any major ones. So, it’s time to think about unofficial holidays and celebrations to entertain your students and create crafts to go along with the date. Here are a few unofficial celebrations to consider in your classroom.
National Grandparent’s Day
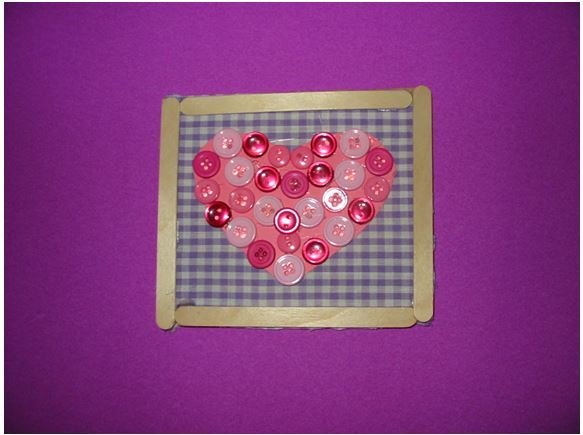
The first Sunday following Labor Day is dedicated to grandparents. This is a special day to express love and appreciation for grandparents by giving cards and presents (especially homemade ones) and holding family gatherings. Talk about the roles that grandparents play in your child’s life and the special times they have spent together. This craft is all about the love and buttons. Who remembers grandma having a button box? This hanging heart craft is fun to make and suitable for gift giving.
Materials:
- Square of cardboard
- 4 Popsicle (craft) sticks
- Piece of fabric
- Construction paper
- Heavy-duty glue or low-temperature glue gun
- Safety scissors
- Buttons
- Magnetic strip or easel frame (optional)
Directions:
- Prepare your work surface. I like to put a plastic tablecloth on the table to protect it from glue and any other art material. In this case it will also catch any excess buttons that may fall from the craft or not be used. Everything is in one cloth for cleanup.
- Cut a square of cardboard approximately 5-inches by 5-inches. Next, cut a scrap of fabric the same size. Have the child glue the fabric to the cardboard. Set this aside to dry.
- Children will need to glue the craft sticks along the edges to make a frame. You will need heavy-duty glue or a low-temperature glue gun. These glue guns are handy, but always supervise your students when in use. I chose to leave the sticks in their natural form, but you can paint them in colors your students like. Again let this part of the craft dry.
- Draw and cut a heart shape from construction paper that will fit inside the square. Choose a color that coordinates with the fabric. Glue this heart in the center of the frame.
- Now, invite your students to choose buttons that coordinate with the heart color. They can be different hues of one color. With my example, I used a variety of pink-colored buttons to blend with the pink heart.
- Glue the buttons in place. Start along the outline of the heart and then fill inside the shape until it is completely covered with pretty buttons.
After the project is dry, you can place a piece of magnetic tape on the back so it can adhere to a kitchen refrigerator or place the frame inside a stand-up easel to display this craft on a table.
International Chocolate Day
There are several days in the year where chocolate is dedicated and one is International Chocolate Day on September 13. The “chocoholics” in your class will love to make this simple craft along with a cute message at the top. So gather some aluminum foil and see if you can replicate the famous Hershey’s Kiss that has been an American favorite since 1907. These bite-size chocolates have a distinctive shape – flat-bottom teardrops, and this creamy milk chocolate confection has been enjoyed and shared by kids and adults throughout the generations.
Materials:
- Aluminum foil
- White paper
- Construction paper (any color)
- Markers
- Glue
- Safety scissors
Directions:
- This craft is not too messy, but you still may want to cover your tabletop with newspaper to avoid glue leaking onto the furniture.
- Take a sheet of aluminum foil and let your students scrunch it a bit. Unfold it and draw a Hershey’s Kiss shape with a black marker. The kiss is a flat-bottomed teardrop shape.
- Invite the kids to carefully cut the foil with a pair of safety scissors.
- Run a line of white school glue along the kiss shape and place this down onto a sheet of construction paper. Let the child choose his/her favorite color.
- Each Hershey Kiss has a strip of paper to help open the candy. To make this part of the craft, cut a strip from white paper. For fun, have your student write “A Kiss for You” on the paper strip or any other phrase they wish.
- Take this paper strip and roll it around a pencil to curl it. After it has molded it’s curl, carefully place it under the top point of the foil kiss and glue it down on the background paper.
National Ice Cream Cone Day
September 22 is the day designated to Ice Cream Cones. This is also the perfect opportunity to discuss all the dairy products you eat and enjoy. Your students may even want to say “thank you” to the cows for all the good dairy foods we eat, including ice cream. What child (and adults) does not love ice cream? As part of this celebration make this simple cut and paste craft with your class. Build an ice cream cone along with the toppings for a cool and refreshing treat to celebrate this unofficial holiday.
Materials:
- Heavy-duty paper or card stock
- Construction paper
- Safety scissors
- Pencil
- Brown marker
- Glue
- Candy sprinkles
- Sliced nuts
Directions:
- Prepare your work surface for cutting and pasting with this project. Newspaper on the tabletop and on the floor will work well to catch drips and excess candy sprinkles. Clean up will be a breeze if you prepare ahead of time.
- Draw a cone shape on light brown construction paper. It’s a triangle shape. If you don’t have the paper, try using a piece of a paper grocery bag. Set this aside.
- Next, invite your student to choose the colors for the ice cream scoops. Talk about the different flavors of ice cream and the colors they possess. Draw semi-circle shapes and cut at least two scoops. You may want a triple decker-cone with three scoops.
- With all the shapes drawn and cut out, start building the ice cream cone. Begin by gluing the cone shape at the bottom of a background sheet of heavy-duty construction paper or card stock.
- Next, glue on each ice cream scoop, having the bottom the largest and each additional scoop just a tad smaller.
- Take a brown marker and draw criss-cross lines across the triangle so it looks like a real waffle-type ice cream cone.
- Now comes the fun part – it’s time to glue on the candy sprinkles and sliced nuts. Let the children choose among what you have brought to class to decorate their ice cream. Spread on glue and shake the sprinkles on top. Once it dries, you can shake off the excess in the garbage can or onto a sheet of newspaper that can be discarded.
These are only a few of the many fun and wacky days to celebrate in the month of September. Find more celebrations at Holidays-and-Observances.com
References
- Photos courtesy of Tania Cowling, all rights reserved
- Ideas taken from experience in the classroom


