Castles carry history and mystery for kids. These project ideas use materials that are cheap and easy to find around the house.
The mere mention of castles conjures up images of olden time’s, knights in shining armour, fair maidens, high walls, royalty and more. Castles are often included in lessons on medieval history taught in schools. Building a castle for a school project provides students an opportunity to learn about the structure of real castles while having fun.
Choosing Your Materials
Castles come in many different shapes and can be assembled using cheap materials found at home such as paper, cardboard, wood, paper mache, Styrofoam and more. It all depends upon your creativity and imagination.
To make solid base of a castle use cardboard boxes and tubes of different sizes. You can create towers by using paper towel tubes and toilet paper rolls. You can also use shoe boxes, facial tissue boxes, cereal boxes and others.
Styrofoam is also an excellent material to build a castle model. Purchase it in blocks and cut in different sizes according to required dimensions. Styrofoam is very lightweight and can be easily held by even small kids on their school bus. Be careful because it can easily break if handled roughly.
To add fine details to the cardboard or Styrofoam castle structure use paper mache. This is also a great method to create a natural stone texture on the outside of the castle. You can also mold it in any shape to create small images and embellishments.
If you are not comfortable with paper mache, use sponge painting on the external structure to give a real stone look to the castle walls. Create an illusion of stone on the walls by dipping small sponge pieces in gray color. Decorative paper may also work to give the outside walls an interesting texture.
Building a Castle for a School Project
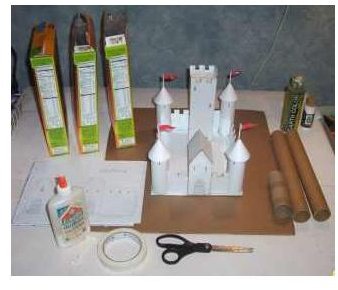
Supplies Required:
White Paper, Cardboard, Scissors, pencil, glue, sponge and gray color
Directions
Step 1
Take print outs for the different structures of the castle from the resources given. You can either use white paper or a sponge to give it a natural stone look, or take an already printed paper with stone color.
Step 2
Cut all the pieces using scissors, or get an adult’s help using a box cutter. Number each piece to remember the proper order. Glue all the pieces on the cardboard to give your castle a solid look.
Step 3
First, create the main tower and then work on the other towers. Fold rectangular pieces to make rectangles. Make some rectangular and conical shapes to be glued on the top.
Step 4
Place all the ready towers at proper points on a cardboard base. The cardboard base should be covered with a blue construction paper to create the look of a moat around the castle.
Step 5
Add small trees and figurines to complete the look of the castle.
Experiment with different materials and have fun! Let us know what you used and how it turned out!