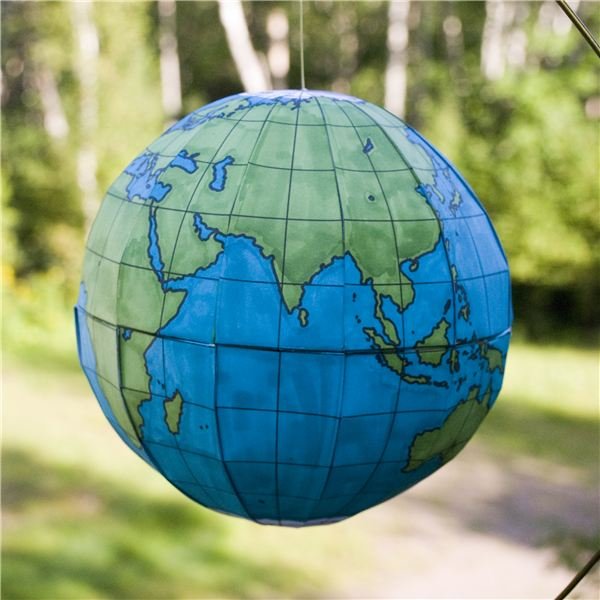
The best way to see how the parts of the world are geographically related is to look at a globe, and putting together a little planet Earth of your own is even better. Read on and learn how to make a homemade globe.
It’s a Small World
Here you’ll find a printable globe template showing lines of latitude and longitude and the outlines of the continents. The rest is left blank for you to fill in. That way, your globe can be customized to show political boundaries, climate , physical geography or whatever else you might want to see depicted on a three-dimensional planet Earth.
[caption id="" align=“aligncenter” width=“600”]
A globe is a really great tool for seeing how the world is put together and for seeing where you are in relation to other continents and countries. Actually assembling a globe can create a more personal connection and put the world right in your hands. Follow along with these instructions and learn how to make a 3D model using our free globe template.
What You’ll Need
- Click to download this globe pattern . This is a downloadable pdf file with four pages of globe pieces and one page of reinforcement pieces.
- A computer and printer to print the files. You can also customize the pattern in an image editing program before printing, if you like.
- Cardstock to print the globe pieces on, and a heavier cardboard (recycled box cardboard works well) for the reinforcement pieces.
- String, fishing line or thread from which to hang the globe.
- Pens, markers, crayons or other coloring tools to customize the globe (unless you did that in an image editing program).
- Scissors or craft knife (depending on the age and skill level of the person making the globe).
- A bone folder or dull knife to score the tabs for folding (optional, but it makes folding easier).
- Glue; something that will dry relatively quickly is best.
- Tape.
How to Make A 3D Globe
The globe template file is set up for letter-size paper and will give you a globe a little more than six inches in diameter. You can make the globe larger or smaller by scaling the pieces on your computer or on a photocopier–just be sure to scale them all by the same amount. You can customize the pattern in an image-editing program before printing, or draw on the printed pattern to add labels, color or whatever else you need (the pattern comes uncolored). Print the pieces onto cardstock. For the reinforcement pieces, you can cut them out then trace them onto a heavier card, or glue them to heavier card and then cut them out, or you can laminate several layers of card together for stiffer pieces. If you choose to laminate layers of card, be sure not to use too much glue to stick the layers together, and let them dry thoroughly under pressure so they won’t warp.
[caption id="" align=“aligncenter” width=“600”]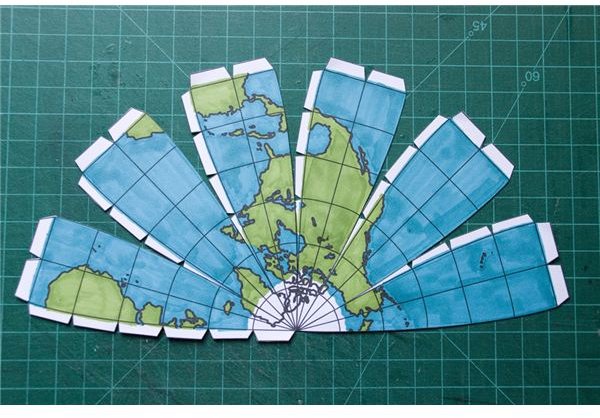 Globe section[/caption]
Cut out the four globe template pieces. You’ll see that each piece is shaped like half a flower with six petals. Cut between the “petals” up to the last line of latitude (indicated on the pattern), but don’t cut them all the way apart. The tabs on the outer edges can be scored along the line where they join to the globe, and folded. Scoring isn’t necessary, but it will make the folding easier and neater. The tabs between petals don’t need to be scored or folded.
Assembling the Hemispheres
[caption id="" align=“aligncenter” width=“600”]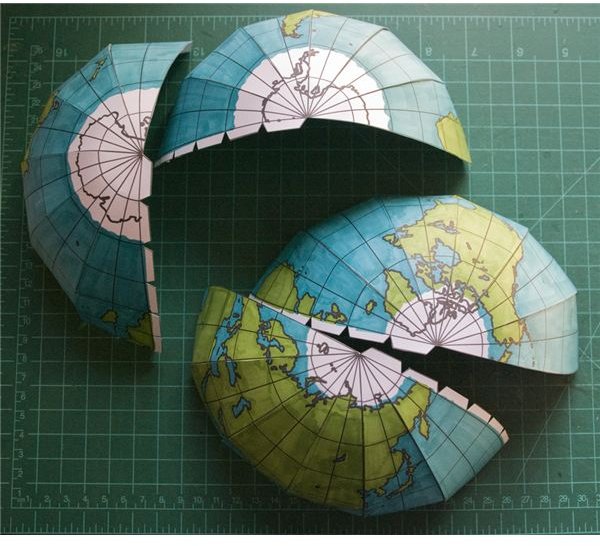 Globe sections assembled[/caption]
To make your homemade globe, first assemble each hemisphere. Make sure to match the two Northern pieces and the two Southern pieces with each other. Apply glue to the front side of the between-petal tabs, working one petal at a time. Use a thin layer of glue so it will stick faster, and attach each petal to the one next to it by lining up the lines of longitude and latitude. Hold the pieces in place with tape on the back side, if necessary. You will soon begin to get a curved shape. Once you have each quarter assembled, glue the two halves of the Northern Hemisphere together with their tabs, and do the same for the Southern Hemisphere.
[caption id="" align=“aligncenter” width=“600”]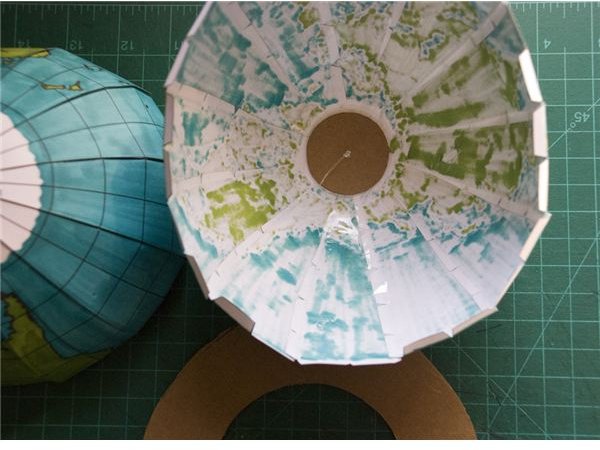 Inside the North Pole[/caption]
Take the smaller of the two reinforcement pieces and make a hole through the center, where indicated on the pattern. Thread a length of fishing line, thread or string through it and knot it on one side so it can’t pull through. Thread the free end of the string through the North Pole on your globe from the inside and pull it through until the reinforcement piece is at the top. Now you have a string with which to hang your globe (if you don’t want to hang the globe, you can skip this step and make a short cylinder of paper or card for the globe to sit on instead).
Attaching the Halves
[caption id="" align=“aligncenter” width=“600”]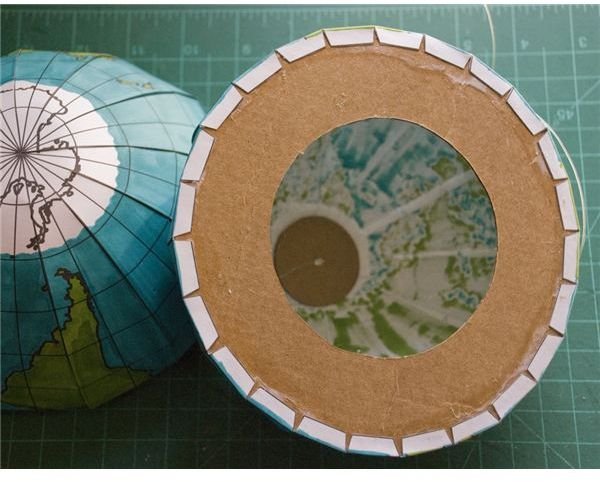 Northern Hemisphere - Adding support[/caption]
Now you need to glue the Northern Hemisphere to the larger reinforcement piece. The tabs on the Northern Hemisphere need to be glued around the reinforcement piece, so dry-fit it first and trim the reinforcement piece to size if it’s a bit too big. Spread glue on the inside surface of the Hemisphere tabs and glue them to the bottom of the reinforcement piece (see the photograph). The hole in the center of the reinforcement piece should help you hold on to it to get a good fit. Now spread glue on the outside surface of the Southern Hemisphere tabs, make sure they are folded at a right angle (roughly) to the surface of the globe, and stick the two halves of the globe together (this part may be a little tricky, because there’s no way to get inside and press the tabs down, so be patient). Hold the pieces together until they stick and then let your globe dry thoroughly.
More Globes to Make
This globe is designed to be very basic to allow for customization in any way you like. Add color, labels, stickers or even a gold star to mark your own position in the world. If you enjoyed this, the U.S. Geological Survey has some great globes of other planets and moons that you can download, print, and make. Their models use styrofoam balls as a base.
References
- U.S. Geological Survey. “Maps & Globes Gallery.” Online at http://astrogeology.usgs.gov/Gallery/MapsAndGlobes/
- Planetary Visions. “Map projections : Sinusoidal Interrupted.” Online at http://www.planetaryvisions.com/Project.php?pid=2236
- Images, including photographs and globe pattern, by the author.