I did this project with my daughter when she was in 2nd grade and she absolutely loved it. Children this age learn a lot learn a lot about general plants and their needs, so I thought it would be interesting to experiment with Venus FlyTraps. The project is done over the course of a few weeks.
Second graders learn a lot about plants and animals in science, and they love to experiment. This fun project utilizes students’ natural curiosity about the world around them, and teaches them about the diversity of plant life that surrounds all of us.
What You’ll Need For The Experiment
Gather the following supplies, based on the number of students, and how many students per plant.
- Venus FlyTraps
- Flies
- Distilled Water
- Pot
- Peat Moss
- Cookie Sheet
- White Posterboard
- Markers
Project Steps
Purchase some venus flytraps for your classroom. They are not expensive at all so you can order more than one. There are many places online that sell them, such as mycarnivore.com.
Make sure you have a pot for each set of venus flytraps that you order. Each pot will need a cookie sheet to go underneath of it. This cookie sheet will hold extra water for the plant.
AdvertisementPut some peat moss in the bottom of your pot before you transfer the venus flytrap in to it.
Give your new venus flytrap some water. Important: Use only distilled water or rain water. The water from your school’s sink will kill the venus flytrap. You can buy distilled water at the grocery store for approximately $.79 a gallon. You could also set out some buckets outside your classroom door to collect rain.
AdvertisementKeep your venus flytrap wet. Don’t let it dry out. Make sure you pour some water in the cookie sheet to keep the flytrap watered even when you go home for the night.
Feed your flytrap flies or other insects. Note - Don’t do this too often as they don’t need to eat that much. If you have a lot of bothersome flies in your classroom you won’t need to feed the flytrap at all, because it will catch its own flies. (A nice benefit at times of the year when doors and windows are left open to bring in cool breezes… and, unfortunately, insects!)
AdvertisementUse your white posterboard to create a chart that organizes which student gets to water the venus flytrap each day. Each child should get to take a turn.
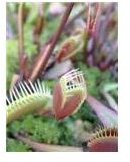
Have the students draw a picture of the venus flytrap on a piece of paper. Then hand out a diagram of the plant with spaces for each student to label the plant’s parts. The student should be able to label 3 basic parts:
Advertisement
- The cilia (they look like eyelashes coming off of the end of the leaf of the flytrap)
- The red pigmentation (color inside of the leaf)
- The trigger hairs
- Explain how the plant parts work to trap an insect:
- Tell them that the beautful red color attracts the flies and other insects
- The trigger hairs are used by the flytrap to tell if an insect has landed inside of their leaf. When an insect lands there the tiny little hairs tell the plant to close its leaves and trap the insect inside.
- The cilia keep the insect from working its way out of the plant, sort of like a cage.
Explain to the students that the venus flytrap works in much the same way that our mouths work. When we put food in our mouths the saliva begins to break down the food. Try this concept out with a piece of cotton candy. The flytrap works in the same way. Its acidic juices come out and break down the insect so that it can digest it. Venus flytraps open back up about 12 hours after they have either lost their prey or digested their prey.
Ask your students why they think a fly would land on a venus flytrap? Why don’t they know that the plant might harm them? Remind them that the beautiful red color is designed to attract insects. Once a fly lands on the plant, it is too late and the insects are trapped.
AdvertisementFinally, read some books about flytraps to your students. You can get some great ones at the library or you can order Venus Flytraps (Early Bird Nature Books) by Kathleen V. Kudlinski and Jerome Wexler at Amazon.com.
Some Final Tips
For fun, you can have your students name the fly traps. Then as you observe each one you can refer to them by name. This will make the project more personal for the kids.
Remember, you need to remind the students to only use the ‘special water’ for watering, and you will need to keep the kids from sticking their fingers into the flyptrap. Both will cause the plant to die. Have some flies at the ready (collect some in a glass jar with a perforated top), so you have a fly to drop in to each plant. This allows the the kids to see what happens, and satisfies their curiousity, hopefully keeping the natural urge to poke and prod the plant at bay.


