Easy Method for Making a Photosynthesis Concept Map with Example
Using concept maps is an excellent way to teach a particular concept. This method can be used for teaching any concept. It makes use of graphical tools that organize and represent knowledge. In a concept map, ideas are represented by enclosing them in boxes or circles. They are connected by lines showing relationship between two concepts and the relationship between boxes is represented by writing proper phrases on connecting lines. Concept mapping includes joining of ideas and present them in a graphical way to define a concept to make it easy for a person to understand it.
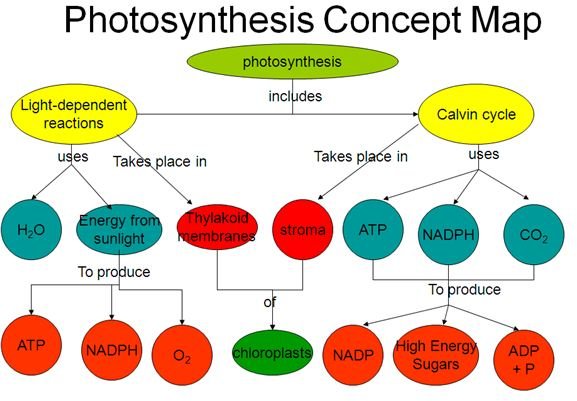
Help your students better understand the complex process of photosynthesis in plants with concept mapping. This method gives students a visual representation of the concept. By joining the proper words, you can create a well organized concept map. We’ll walk you through the process here.
Materials Required
You will need only a pen and a paper to create this concept map. Before you start, think of all the important terms and words related to photosynthesis in plants.
Terms Required
The words included in photosynthesis concept map are
- Photosynthesis
- Light dependent reactions
- Calvin Cycle
- CO2 (Carbon Dioxide)
- H2O
- Glucose
- O2 (oxygen)
- Chlorophyll
- electron transport chain
- NADP+
- ATP
- Stroma
- Thylakoid membrane
- photon
- chloroplasts
Steps to Draw The Map
- When you create a concept map, you are creating a sort of hierarchy of processes. The first step is writing the broadest term. This is the term that all the other terms relate to, in this case, it is photosynthesis. Draw a circle and write photosynthesis. You can color this box if you wish to.
- Now write the next broad topics that form the process of photosynthesis. These are Light Dependent Reactions and Calvin Cycle. Make two circles on each side below Photosynthesis circle. Join these two circles with the photosynthesis circle.
- Now focus on these two circles separately. Each of these concepts has their own sets of terms. The Light Dependent Reactions need Water and Sunlight and takes place in Thylakoid Membrane of Chlorophyll. Draw circles for all these three terms below the Light Dependent Reaction circle and join them to this circle alone. By using water, sunlight and chlorophyll, this reaction produces ATP, NADPH and O2. Write these three products under water and sunlight circles and join them. Make sure to use short phrases on the connection lines to explain the relationship between different circles.
- Now we come to the light-independent reactions which are called Calvin cycle. This is the second stage reaction that takes place after the first reaction as it makes use of products of light dependent reaction. It takes place in stroma of chloroplast and uses ATP, NADPH and CO2. Make three circles below the Calvin Cycle circle and write the names of components to be used. This reaction produces NADP, Glucose and ATP + P. Again make three circles at the bottom and connect them with above given components.
(Click on this image to get enlarged view.)
Photosynthesis is a complex process which takes place in plants to produce energy using water and sunlight. With the help of a this wonderful concept map, you can teach students a complex process in very easy steps. Using visuals helps students to better remember the material. For even better understanding, have your students make their own concept map.
References
- Photosynthesis Concept Map : people.virginia.edu/~sak5a/photosynthesismapone.ppt