Classroom Ideas for Preschool Activities Using a Lighthouse Theme
Lighthouse History
Explain to the children about the history of lighthouses. The original lighthouses did not have electricity and had to use candles or lanterns. Lighthouses allowed boats to know where land was at night so the boats would not crash.
Counting and Large Motor Activity
Lighthouses have a lot of steps. They start at the bottom of the lighthouse and spiral around the inside base all the way to the top. Explain to the student that the lighthouse can easily have over 200 steps that the lighthouse keeper has to climb each time he needs to care for the light! This math game will help the students practice counting and will give them an idea of how tiring it would be to climb that many steps several times a day.
Have the children form a circle. They can count to 10, 12 or 20 depending on their ability. Decide which set of numbers they’re going
to practice. Tell them they’re going to pretend to climb 120 steps. If they are going to count to 10 each time, the group will need 12 objects (erasers, bean bags, etc.) to place in the middle after each set of 10. For the number 12 they’ll need 10 objects and if they count to 20, they’ll need 6 objects.
Start counting and once they reach the first “level” (10, 12 or 20) have one child place their object in the middle of the ring of students. This will help keep track of when they reach the “top.” Continue until the last object has been placed in the middle. Congratulate the students for making it to the top of the lighthouse!
Near and Far
Tell the students to pretend they’re on the walkway that circles the top of the lighthouse. If they look out to sea, they’ll see boats.
Would a boat look really big (near) from this high up or would it look really little (far)? Discuss what else they’d see when looking out over the beach. (Seagulls, rocks, sand, people playing in the water.) Reiterate that everything would look really tiny or far away from this height.
Lighthouse Shapes Math Activity
Pass out the shapes needed for the craft project described below and discuss each shape with the children. Hold up a shape and have the students name the shape. After each child has had a turn to name a shape, have them sort the shapes into groups in preparation for the craft.
Lighthouse Art
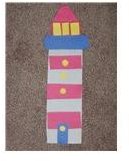
Precut construction paper into shapes for the lighthouse activity. For each student you’ll need:
- 1 white rectangle, 9 inches by 3 inches (lighthouse base)
- 3 red rectangles, 1 inch by 3 inches (lighthouse stripes)
- 1 blue rectangle, 1 inch by 4 inches, round the edges to make an oval (walkway at top)
- 1 red square, 2 by 2 inches (top of lighthouse where windows will go)
- 1 red triangle, 3 inches, cut a small section of the top off so it’s flat instead of a point (roof of lighthouse)
- 1 blue rectangle, 1 inch by 2 inches (lighthouse door at base)
- 4 small circles, about ½ inch each (one for the door and one for three of the stripes)
- 3 small yellow rectangles, 1/2 of an inch by 1 inch (the windows near the top)
Have the students glue the red stripes to the lighthouse at equal intervals. The top two stripes and the white stripe between them will each have one yellow circle glued in the middle.
Center the small blue rectangle at the bottom of the lighthouse base and attach it with glue. Place a yellow circle toward the top of the door and glue it in place.
Place the blue oval at the top of the lighthouse base and glue it in place. Glue the small red rectangle to the underside of the top of the blue oval. The three small rectangles will be glued to this rectangle. Add the triangle shape and glue it at the top. This completes the lighthouse craft!
More Lessons to Coordinate With a Lighthouse Theme
Preschool Beach Lessons and Centers