How to Make Preschool Caterpillar and Butterfly Crafts for Butterfly Lifecycle

Caterpillar Craft
Make this cute caterpillar after reading The Very Hungry Caterpillar by Eric Carle or Waiting for Wings by Lois Ehlert or another book about butterflies and caterpillars.
Materials
One large green construction paper leaf, per child
Six colored circles for the caterpillar’s body, per child (use light green if you’ve just read The Very Hungry Caterpillar or white, yellow and black for a Monarch butterfly caterpillar)
Small piece of pipe cleaner, per child
Glue
Hole punch
Prior Knowledge
Read a book about caterpillars and butterflies. Ask the students if they remember what a butterfly is before it becomes a butterfly. You might want to go over the life cycle again if you have been learning it.
Procedure
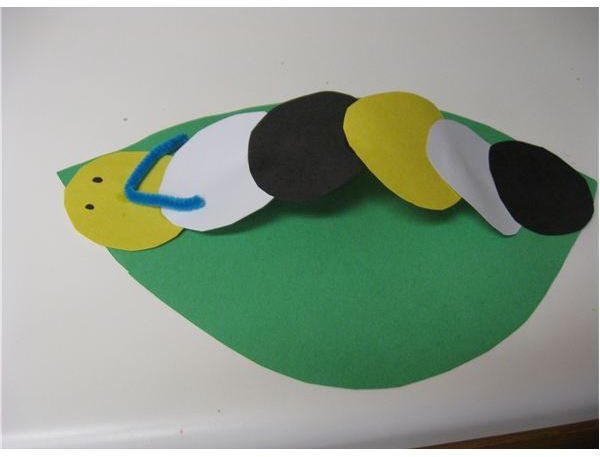
Give each preschool student six circles. Show them how to overlap the circles and glue them together to make the caterpillar body. Use a black marker or crayon to draw eyes on the first circle of the caterpillar. Fold the pipe cleaner into a V-shape and glue it onto the head behind the eyes.
After the glue is dry on the caterpillar, then glue it onto the leaf. It will be a little long, but if you only glue the first and last circles, then it will pop up a little and look three-dimensional. Now punch a few holes into the leaf to show where the caterpillar has been munching on it.
Extend
If you are making the monarch caterpillars, then this a fun way to review patterns. Let the students make a pattern with their colored circles for the body.
Butterfly Craft

This sponge painted butterfly makes a great craft for spring.
Materials
One empty toilet paper roll, per child
One 4 1/2" by 6" rectangle of black construction paper, per child
One wing-shaped white paper, per child
Two wiggly eyes, per child
Two small pipe cleaners, per child
Tempera paint and small pieces of sponge
Glue and tape
Procedure
Show students a completed model of the butterfly. Give each student the butterfly wings, paint and sponges. Show them how to sponge paint the wings. After they have painted the wings, put them aside to dry.
While the wings are drying, work on the body of the butterfly. Pass out the toilet paper rolls and black paper. Tell them that this will be the body of their butterfly. The students put glue onto the paper and then wrap it around the toilet paper rolls. Put a line of glue on the top edge of the black paper and glue it down smoothly. Next have the students glue the wiggly eyes onto the body of the butterfly. To attach the pipe cleaner antennae, it is easiest to use a small piece of scotch tape to the inside of the roll. You will probably need to do this step.
After the wings have dried, put glue down the center of them and attach to the toilet paper roll. Let dry.
Extend
These butterflies and caterpillars would make a really cute spring bulletin board.
Assessment
For both of these activities, students should be able to follow simple step-by-step instructions, use the glue properly (not overdoing it), and begin to learn spatial relationships (where the eyes go, where the antennas go and so on). For a true assessment, the craft should look like the student made it.
This post is part of the series: Butterflies, Butterflies
This is a series is articles about lessons and activities to do during a butterfly unit. It includes science, math, literacy and art activities.