Preschool Crafts on Cars to Teach Kids about Street Safety
Discuss Car and Road Safety with Preschoolers
Before you make the car craft with kids, take a few minutes to talk to them about how to safely ride in the car, such as the importance of using their seatbelts or staying seated while the car is in motion. Also, stress street safety rules like only crossing the road when holding the hand of a trusted adult and looking both ways before crossing. Most young children are capable of learning and understanding basic safety rules like these.
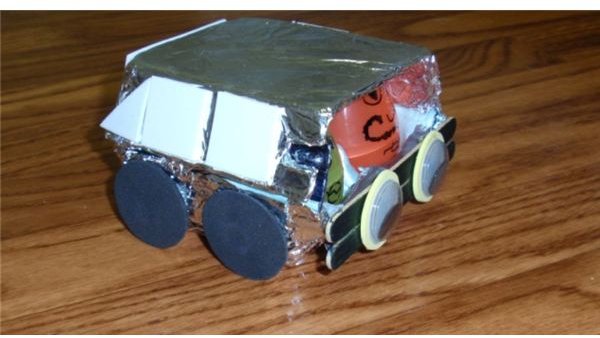
Creating simple car crafts for your preschoolers and incorporating them into simple lessons will help them learn and retain the information more effectively. This car craft will also present opportunities for preschoolers to practice creative play, shape recognition, coloring, cutting, and gluing skills. Use the provided materials list and instructions that follow to create the egg carton car craft shown below.
Egg Carton Car Craft


Materials Needed
- Recycled egg carton - half of one per child
- Aluminum foil - 2 sheets, each 1 foot long
- Wooden craft sticks (2 1/2 sticks - 2 full size sticks and 2 quartered pieces)
- Shape stickers (or foam board cut into shapes)
- Black washable marker
- Permanent marker
- Scissors
- Craft glue
- Tape
- Googly eyes - 2 large ones
- Plastic eggs - 4 of any color
- Recycled newspaper
Adult Preparation for the Car Craft
Collect the egg cartons for this toy car project ahead of time. You will need one-half carton per child. Cut the egg carton in a 4-inch section to prepare it for the project. Keep the tab that closes the egg carton intact, so it can be used to close the car door on the final product. The piece of carton you cut should have four complete egg cups and resemble a box shape when you are finished. Also, cut the half wooden craft stick into two quarter pieces.
If you choose to make your own shapes from foam board instead of using precut shape stickers, it will save time to already have the shapes drawn on the foam board. Use your judgment to determine whether or not to cut them advance as well, depending on the age, skill level, and number of children who are making the craft.
You may also choose to decorate the plastic eggs by drawing faces on them with a permanent marker beforehand. A regular marker may smudge or come off the child’s hands.
Get Making - Step by Step
Cover your work surface with the newspaper. Provide the child with a 4-inch section of egg carton and a 2 sheets of aluminum foil. Help him or her cover the outside of the bottom half of the egg carton by wrapping it with one piece of the foil. Secure the ends of the foil on the inside with tape. Open the lid on the egg carton, and repeat the same procedure to cover the top half with aluminum foil.
Have the preschooler color the front side of the two wooden craft sticks with a black washable marker. Allow the marker to dry before handling again. Then, lay the sticks side-by-side on the newspaper with the colored sides facing down. Glue the two smaller pieces of craft stick to the backs of them to hold them together. Set them aside to dry, while allowing the child to move on to the decorating phase of the project.
Give the child shape stickers to decorate the outside of the egg carton car. If you are making your own shapes from foam board, help the preschooler cut the shapes and attach them with craft glue. Take advantage of this time to do a quick review of the various shapes and colors you are using with the child. You will need: four large circles for tires, two medium circles for the headlights, four squares and two thin triangles for the side windows, and one rectangle for the back window.
Help the child correctly position the shapes and attach them with the glue. Place two squares and a triangle on each side of the top half of the egg carton car. Position to large circles on the bottom of each side where the tires should go. Attach the rectangle horizontally on the back of the car. *Helpful hint: Strong tape, such as duct tape or packing tape will also work well to hold them in place if time restraints do not allow enough drying time for the glue.
Once the wooden craft sticks are dry, attach the two smaller circles to the colored side of them and place to large googly eyes in the center of the circles. This will serve as the front grill and headlights of the egg carton car. Glue or tape the piece to the front end of the car.
Use the black marker to color in the tab on the lid and any other pieces of carton that are still showing on the outside of the car.
Load the plastic egg people in their car seats formed by the egg cups, pretend to buckle up, and drive safely!
Using the Car Craft to Teach Directions
For a fun and easy way to use this crafts project to also teach kids about following directions, create stop and go signs from construction paper. Cut a green circle and a red octagon and print the corresponding traffic commands on them. Explain to the children that green means go and red means stop. Have them line up on the floor with their egg carton cars and let the fun begin. When the green sign is held up, they must move around the floor with their cars. When the stop sign is flashed, they must freeze.
Preschool crafts with cars and trucks such as this egg carton car project, especially when used in conjunction with other activities and lessons on road and car safety, help young kids learn and remember important rules. Following those guidelines helps keep them safe.
References
- Twiggle Magazine, http://www.twigglemagazine.com/September-activities/Street-safety-kindergarten-lesson.html
- All images property of the author.