A Shark Craft for Kindergarten Students Using Construction Paper and Glue
Materials
This is a great craft to supplement a story about sharks, or an instructional ocean lesson plan. It is versatile because, for beginner kindergartners with fewer skills, the teacher can have all the pieces cut ahead of time and students just have to follow instructions in gluing and assembling their sharks. For advanced or later year students this craft can be used as a lesson in shapes and cutting.
Materials depend on the age of students & procedure followed.
- blue construction paper & white paper
- pencils
- scissors
- glue sticks
- black crayon or marker
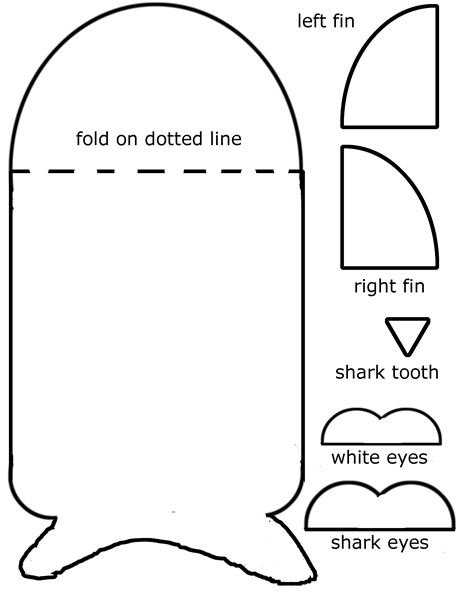
- template (see the images at the end)
Directions
See the illustrated example at the end for guidelines and a template.
- If the craft is geared toward early kindergartners, the teacher should have one body, one left & right fin, six teeth, and one of each of the two eye pieces, which should be pre-cut for each student.
- If the kindergarten art lesson plan is geared toward more skilled kindergarten students, the teacher should have students cut out the pieces of their template. Each child should receive a sheet of blue or grey construction paper and a small piece of white paper. They will use a pencil to trace their template pieces on the construction paper and cut them out.
*Note-they will have to trace and cut six teeth.
When students have all the sections of their shark ready:
- Students should first fold their shark head down over the body. (see the template for the guideline)
- They should then open the head back up and glue their six teeth along the top of the rounded edge on the front of their shark. As they are gluing, the teeth will be pointing straight up. The teacher can instruct students that it looks like they are gluing little mountains across the top of the world.
- After the teeth are glued, they should re-fold the head down. The teacher may have students glue the head down, or leave it so that there is a flap.
- Students will then attach the left and right fin. Students will put glue along the straight edge of the left fin and then stick it to the back, left side of their shark body. Repeat for the right fin on the right side.
- In this step, the children should glue their shark eyes (the bigger piece) to the top of their folded down head. They will use their glue stick to put a line of glue along the bottom edge, and stick it to the back of their shark. Once it is attached they can put glue on the back of the white portion of the eyes, and stick it to the blue eye outline at the top.
- With a marker or crayon, have students draw eyeballs in the whites of the eyes, and nose holes in the area above the teeth.
Alternate Thoughts & Ideas
- Students can write their name on the shark’s belly or the teacher can have students paste information they learn about the ocean or sharks there. They can also use the belly to glue paper fish that the shark might eat. This could be incorporated into an art lesson using the “Rainbow Fish” book.
- If construction paper is not an option or for a quicker project, the teacher can give each student a template, and have them complete the craft with crayons, scissors, and glue. The students would color their shark, cut out the pieces and assemble. They would use the tooth template and paper scraps to cut out the extra teeth.
- The teacher might have students label the different shark body parts, directly onto the shark.
Template & Illustrated Example

Click for a larger view.
Resources & Images
All images in this article are copyright of the author and may be used or reproduced for educational purposes.