Homeschool Sewing Lesson: Make a Craft Apron
It’s easy to add a useful skill to your child’s education by adding a sewing lesson to your homeschool curriculum. If you are not an experienced seamstress, you can make this a great learn-together class. Make the mission of learning to sew more of a project than a lesson. This simple project will help your students learn some basic sewing skills and be quite useful. Depending on the fabric you choose, this apron can be a great way to introduce boys or girls to sewing.
Safety
Your child needs to understand how to sew safely. There is just no way to get around learning to sew without using sharp scissors, needles and pins. Thimbles protect fingers so find one that fits and encourage students to use it. Don’t let your child get into the habit of putting needles or pins between their lips while working. Practice these safe habits yourself because children learn more from what they see us do than what we say.
Supplies
To complete this project, you will need to take a trip to the fabric store for the following supplies.
- 1 yard of 45 inch wide fabric for a small to medium sized apron or 1 1/3 yards of 45 inch wide fabric for a medium to large sized apron. Choose a sturdy fabric such as denim or canvas.
- Matching thread
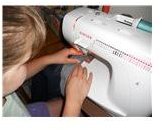
- Sewing machine
- Large safety pin to thread strap through casing.
- Paints, patches, and appliques to decorate apron.
Before cutting the fabric, make sure you launder it to preshrink it and remove any excess finish.
Cutting Instructions
Cut three, 31/2 inch straps using the full width of the fabric. Using a rotary cutter ensures straight edges but scissors work just as well. You may need to help younger children cut straight. To make it easier to cut out the apron pieces, you can make patterns for the straps out of newspaper.
With the right sides of the fabric together, fold the left raw edge over 14 inches for a small to medium sized apron and 15 inches for a medium to large apron. Fold the right raw edge over to meet the left raw edge.
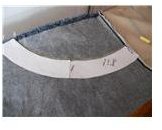
Use casing pattern to cut out four casing pieces. Your student can either pin the pattern to the fabric or trace around it with chalk to know where to cut. Sew the center of two pieces together so that there are two long casing pieces. You will want your child to try to cut the casing on the grain line.
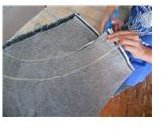
Your student will need the casing pattern once again to cut out the apron. Pin the casing pattern to the fabric as shown here and have your child cut out his or her apron.
Use the remaining fabric to make the pocket in the desired size for the apron. For a carpenter’s apron or craft apron, you may want a long pocket. If you are making a cooking apron, you may just want one small pocket. This pattern is flexible.
Put the Casing on the Apron
Have your student press the outside edge of both casings 1/4 inch to the wrong side. Topstitch 1/8 inch from the folded edge with a sewing machine.
Next, place the casings on the apron body with the right sides together, matching the top edges. Pin all the pieces in place and sew the casings to the apron using a one-quarter (1/4 ) inch seam. The casing will be completed after the rest of the apron has been hemmed.
In order to stop the casing from rolling to the outside of the apron, have your student press the seam.
Hem the Apron
Hem the top and sides of the apron first. Your student will need to place their apron right side down on an ironing board. Next have them fold the top and side corners over one inch and press. Fold another 1/4 over and press again. They may need to trim the area where the casing goes to keep it open. Now stitch the hems in place.
Place the apron on the right side down again and fold a one inch hem on the bottom of the apron and iron. Fold over another 1/4 inch and press. Stitch this hem in place.
Finish Casing
Turn the casings to the wrong side of the apron and press. Topstitch the casing 1/8 inch from the side edge. Leave the tops and sides of the casings unstitched. Your student can tack it at the beginning and end of the hemmed edge. Now finish stitching the casing to the apron.
Prepare the pocket by hemming around the entire fabric.
Fold the pocket in half and mark the center with pins or chalk. Fold the apron body in half and mark the center with pins or chalk. Place the pocket center at the center of the apron body at about 15 inches for the top of the apron body. Pin the pocket to the apron.
Leaving the pocket top open, top stitch three sides close to edge. You can make several pockets by stitching a line down the pocket.
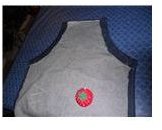
Decorate Apron
If your student would like to embellish their creation, now would be the time to do it. They can use fabric paints, appliques, lace, patches whatever they choose to decorate and personalize their apron. The can even add a ruffle to the bottom to make it frilly.
Straps
Join the strap pieces by using a 1/4 inch seam on 3 1/4 inch edges. Join the three straps together and press open the seams. Fold the straps over at both ends 1/4 inch and iron.
Now have your student fold the straps in half with the wrong sides together forming a 1 3/4 wide inch strip. Press with an iron to make a nice crease. Fold it in half again to form a long strap. Press this again before topstitching around all the sides.
Insert the strap into the casing using a large safety pin. Attach the pin to one end of the strap and work it through the casing starting at the lower left side of the apron. Work up to the top of the bib and back down the other side. The continuous strap will be adjustable for various sizes.
References and Image Credits
Author’s experience as an educator and seamstress
All images are the property of the author; all rights reserved