Do You Need To Make A Model Of An Iroquois Longhouse? Here's How!

Gather Together Your Materials
If you need to make a model of an Iroquois longhouse for a school project, it is a relatively simple project. Perhaps it’s part of your study of the
book Indian In The Cupboard, or it may be so that you can learn more about the Iroquois Indians. Regardless of what you need it for, here are the steps.
You will want to make sure that you have all of the materials you need before you start building your Iroquois longhouse. These materials include:
- Wood
- Shovel
- Bark
- Nails
- Saw or Axe
- Knife
- Water
Get Ready To Build Your Longhouse
Now before you start using your materials, take a moment to determine just how big you want to make your Iroquois longhouse. Most of
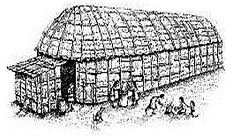
them measured 20 feet wide by 20 feet tall and between 180 to 220 feet long. Once you know how big you want your Iroquois longhouse to be, you will want to cut the wood to fit these dimensions.
NOTE: You may want to cut your own wood, which is what the Iroquois had to do. Make sure that the wood you use is sturdy and straight to ensure structural stability.
It should also be flexible, because the rafters need to be curved, not pointed. Now cut holes in the base wood that you are using. You will need 4 base posts, which need to be evenly spaced around the perimeter.
Construction
Next, build your frame. This is a structural grid that has a rounded roof.
Use your poles and posts to create a long, secure frame. Keep in mind that the Iroquois would have had a 10 foot walkway down the middle.
Their joints were secured with birch wood but you can opt to use nails instead. If you want to use bark though, it will need to be torn into strips and soaked in water so that you can braid it.
Cover Your Structure With Bark
The longhouse’s frame should be covered with huge sheets of elm tree bark. However, before this can be done, this wood needs to be weighted down so that it won’t curl.
The bark is then woven through the frame and smoothed for weatherization purposes. Some holes should be there, approximately at 20 feet intervals over the center aisle where smoke from the fire would need to escape.
Final Steps
After you have built your Iroquois longhouse you will want to reinforce it with another, smaller frame. You can also purchase some small scraps of woven fabric or fake animal fur to use as insulation. This would go inside of the longhouse along with bunk beds, seats and storage rooms. The two ends of the longhouse were used for communal storage, and the center aisle is where fires were built so that cooking could be done.
Enjoy Your Results!
Now that you have followed these steps, you should have a beautiful model you should be proud to show off to your friends and classmates.
References
For more information on how to make a model Iroquois longhouse, please see:
Arizone Geographic Alliance. Iroquois Longhouse.
New York State Museum. Plans for a Mohawk Iroquois Longhouse.