Tips for Formatting an Essay in Microsoft Word: Fonts and More
Why is Formatting Important?
Formatting refers to the arrangement of text on a document. There are many ways to format different types of documents. The focus of this guide will be formatting for essays.
In general, you will want your documents to look neat and professional. Special attention to formatting will ensure that your essays make a great first impression. In fact, some teachers will mark your paper down if you do not format correctly, or follow specific guidelines the teacher has requested (such as double spacing.)
Typography
Typography is a term that was first used when referring to how letters were chosen and set for printing on a press. In today’s age of word processors, it now refers to font selection and formatting. Pay careful attention to how you use typography in your essay. Font selection is of key importance. When you are writing an essay for a school assignment, you should make sure your font looks neat and professional. Remember, your essay will have to be read at some point, so you should make sure it can be read easily.
Fonts to Choose
Serif fonts assist with readability. A serif font has little lines on the end of the character. The lines help the eye move from letter to letter more easily. Some examples of standard serif fonts in Microsoft Word are Times New Roman, Courier New, and Book Antiqua. You should use a serif font for the majority of your essay. Be careful, though. Some serif fonts, still would not be acceptable. For instance, serif font styles such as Goudy Stout or Engravers MT would not look professional as the text of your essay because they are big and bulky. Choose carefully.
Sans serif fonts do not have the little lines at the end of the letters. Some examples of sans serif fonts are Arial, Calibri, and Comic Sans. Usually, sans serif fonts work well in short sections of text such as headings or titles. It is best not to use a sans serif font as the bulk of your essay. Furthermore, while I suggested Comic Sans as an example for a sans serif font, its use is typically frowned upon as it does not present a professional quality.
Font Size
Another aspect of typography is the size of your font. Fonts are measured in points. A one point font is 1/72 of an inch. A 72 point font would measure one inch. Normally, you should choose 10 to 12 point font for all parts of your essay. Font sizes smaller than ten points become difficult to see and read. Font sizes larger than twelve point are difficult to read as well, and they make your teacher think that you’re just trying to use more space.
Bolding & Italicizing
At times, you may need to use bold, italics, or underlining. Bold is best used only in the title of your essay, if at all. Italics and underlining are typically used when you need to emphasize text or if you are referring to a title of another work.
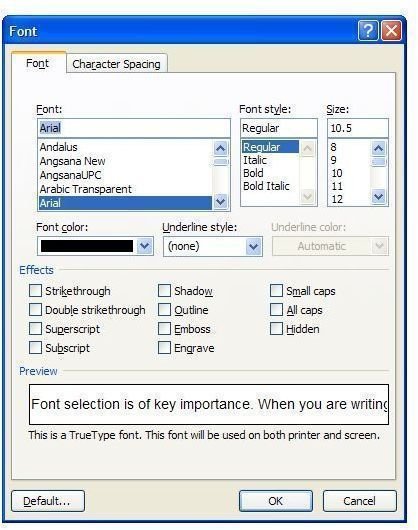
To format your fonts in Microsoft Word, first select the text you wish to format. From there, you have a few options. You can format directly with the formatting toolbar which, by default, appears at the top of the window. You can also use the Format Font Window, which will give you more options. To get there, right click with the mouse and choose “Font” from the menu that appears. The Format Font Window looks like the image to the left (click on the image for a larger view). The selected text will appear in the preview pane. As you format the text, you can see how your text will look in the preview pane. When you have completed formatting your text, click OK to return to your document.
Spacing
Spacing refers to the amount of space between lines of text. Typically, teachers ask for double spaced text for most assignments. The extra space between each line gives them room for comments and corrections. The extra space also makes the text easier to read. Always double check your teacher’s spacing policy, though. Sometimes a teacher will require a certain page total for your writing, while expecting single spaced lines. Double spacing will cut the length of your essay in half which will cause you to lose points. Always be sure to double check what the teacher wants.
Typically, headings are single spaced. There’s not much reason to have extra space between lines of your heading, so do not use it unless you’ve been directed otherwise. If you are using a quote of four lines or larger, it requires special formatting. Typically, this should be single spaced, as well.
You can also space at the paragraph level. This type of spacing appears before or after a paragraph.

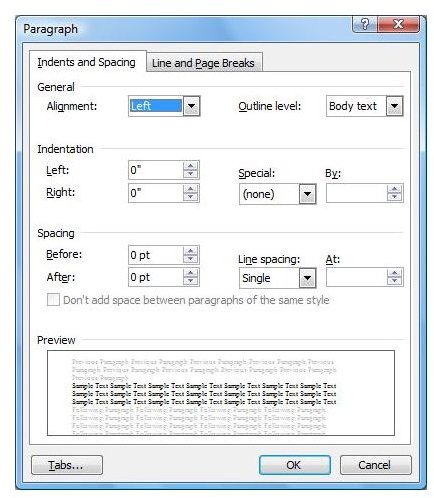
To control spacing in Microsoft Word, select the text, then right click. Choose “Paragraph.” This will open the Format Paragraph Window. It should look like the image to the left (click on the image for a larger view). In the Spacing section, you’ll see two fields: one for Before and one for After. These allow you to space paragraphs apart, either before the paragraph or after. The spacing is measured in points, similar to fonts.
To the right, you can space at the line level. To double space your essay, choose Double from the drop down menu. Similarly, choose Single to single space. There are some other choices for more precise line spacing, but typically double and single will do for most school essays.
Indentation
Indentation refers to spacing from the left or right of the page. For most of the paragraphs in your essay, you will need to indent the first line. A good standard is a .5" first line indent. The tab key is usually set to tab over .5", but it is good practice to use the Format Paragraph Window to ensure that your indentations are correct.
To set a .5" first line indent for all paragraphs, select your text, then right click. Choose “Paragraph.” This will bring up the Format Paragraph Window. In the Indentation section, choose First Line from the drop down menu labeled Special. This will activate a first line indent for your text. Now choose the measurement for the indent. Again, .5" is a good standard to follow.
There are other times when you may need to pay attention to indentation. Let’s say you have a research paper that requires a bibliography or works cited page. The hanging indent option can come in handy and many works cited entries require one. A hanging indent is like the opposite of a first line indent; it indents everything but the first line. You set up a hanging indent in the same way you do a first line indent, only choose Hanging from the drop down menu in the Format Paragraph Window.
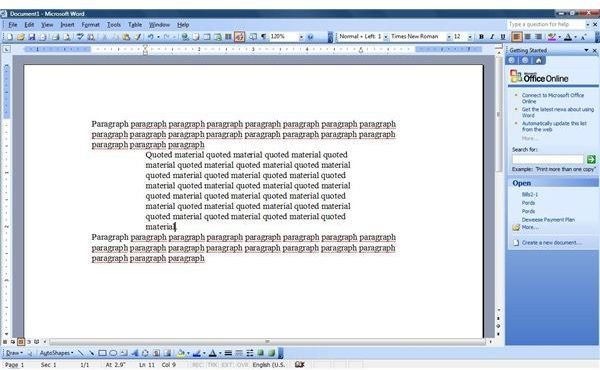
Finally, if you are quoting material of four or more lines, you will need to separate the text from the rest of the paragraph and indent both sides. To do this, go to the Format Paragraph Window. Choose the text to be indented and choose the measurement of indent for both left and right sides. Usually, you will want 1" on each side of quoted material. A sample image is attached to show how this should appear on the page.
Working with Images
Sometimes, a teacher will allow the use of images in an essay. Be sure to check with the teacher before adding images as some teachers frown upon their use. Even if the images are allowed, be sure to use them wisely and sparingly. Typically, less is more when it comes to using pictures in essay writing. Teachers want you to create pictures with your words instead!
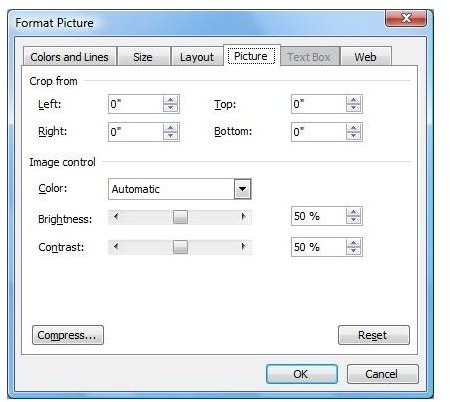
To insert an image you can copy and paste it into the document, or you can use the insert image function. Once the image is placed into the document, it can be formatted. Begin with the layout of the photo. Right click the image and choose Format Picture. Click on the Layout tab at the top of the window. Here you have several options. In line with Text will cause your image to act as text. This option may cause your text to behave in unexpected ways. This option will almost always create large gaps of space in your essay and is best avoided. The Square or Tight options will cause the text to wrap around your image, thus eliminating the problem of the gaps. One of these two options is best.
Next, you will need to choose the alignment of the image. This appears near the bottom of the Layout tab. Choose which side of the page you wish the image to appear and click OK to see your results. If you change your mind about the alignment of the image, you can now click and drag the image to where you would like it. Since you’ve chosen the Square or Tight text alignment option, the text will simply wrap around the image wherever you place it. Be sure that when placing the image, the text remains in a neat and professional arrangement.
Good luck on your essay! If you have any additional Microsoft Word tips to share post them in the comments.