An Elementary Art Lesson Plan Using Types of Lines in Art
Students will be introduced to the element of line and how it can be used in art. They will use this knowledge to create shapes and a work of art. This lesson has curricular connections as it utlizes reading and also helps to practice/strengthen fine motor skills.
Art Resources:
- a reproduction of Van Gogh’s “Starry Night”
- a reproduction of Munch’s “The Scream”
- “Harold and the Purple Crayon” by Johnson
Art Materials:
- crayons
- white paper & black paper the same size
- black paper 1/2 size of white paper
- blue tempera paint
- brushes
- scissors
- glue
*optional: yellow paper
Vocabulary:
line, resist, Expressionism
Motivation:
The teacher reads “Harold and the Purple Crayon”. Students are asked:
Harold had a purple crayon. When he wanted to go somewhere or do anything, what did Harold do with the crayon? How many different lines do you think there are? Can you think of any types of lines, or remember any from the story? The teacher calls on students to draw different types of lines on the board. (thick, thin, straight, diagonal, long, short, zigzag, curve, dotted)
Process: (Part 1)
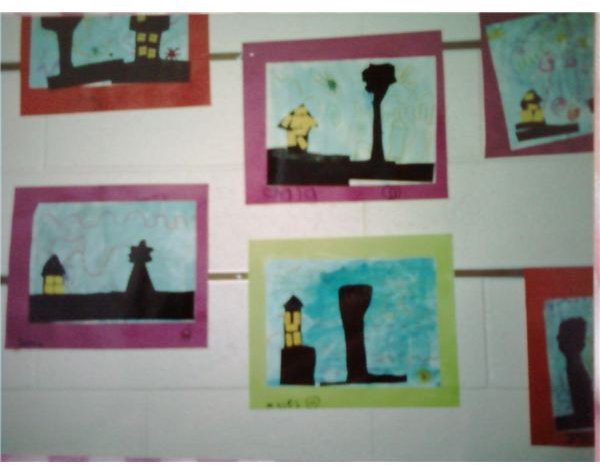
1. The students are shown the works of Van Gogh and Munch and learn about the art movement called Expressionism. The teacher talks about color and spends extra time pointing out the use of line in “Starry Night” and asking about the mood/feeling the art work exudes. Then she/he explains that they will be creating their own Starry Night Sky.
2. Students are given white paper and crayons to create a sky. The teacher directs students to select a color and then describes a type of line they are going to create. “Let’s start with a dotted line. We’re going to start on one side and dot, dot, dot across our paper”. (The teacher demonstrates while explaining) Students are then directed to select another color and the teacher describes another type of line. “We are going to create a curvy thin line…” This continues until their papers are sufficiently filled.
3. The teacher demonstrates the resist technique to students by painting a wash over his/her line drawing. They are given watered down tempera paint and brushes and cover over their crayon skies. While this dries, students work on the second part of the lesson.
Process:(Part 2)
1. Students will now create the foreground for their sky paintings which will be silhouettes of a house and tree on land. Each student is given a large sheet of black paper and a crayon. Students will follow step-by-step directions for this part of the lesson using line. “First we are going to draw a horizontal line along the bottom of our paper.” The teacher draws a line across about 1/5 above the bottom. (This will be the land)
2. The house will be comprised of two shapes: a square with a triangle on top.The teacher describes how to make a square on their land line. When they complete this task, the teacher points out that they’ve made a shape-and asks students to recognize. Then students are shown how to make a triangle on top of their square. If students haven’t noticed what they’ve made-the teacher may ask if they recognize what they’ve drawn using line.
3. Students are shown how to cut along the landscape line and around their house and across the other line.
4. Students follow the same process to create a tree on the smaller sheet of black paper. Older students may be able to create the tree and house on one sheet, but for younger students like Kindergarten or 1st grade, cutting a house and tree out on one sheet will probably be too difficult.
5. Students are shown how to glue their land/house to their expressive sky. (with the crayon side down so the drawn lines of the house will not be seen) Students then decide where they’d like to place their tree on their landscape and glue it down to complete the project.
The teacher may want to follow up with a verbal quiz about types of lines they used to create their art. Teacher could also follow up by having students stand in a line and as a group create the various lines discussed.
*Optional-teacher may give students pre-cut yellow squares to glue on as lighted windows for their houses.